

Analog modeling is a popular trend in plugin manufacturing. As processing power increases, plugins are better able to handle the harmonics and non-linearities of pieces of gear, and can do so with far less latency than was possible even a decade ago. It also makes the transition from analog equipment to digital that much easier. If you know how an API eq works, then you can use an API eq plugin, and vice versa. The tactile response may be different from a mouse and keyboard, and the features may be a bit more limited (such as plugins that turn fixed frequency parameters into variable ones), but there’s still that comparison. So yay! Even more than just the individual processes, though, by combing them together we can recreate the actual signal flow, and thus sound, of an analog mix, and that’s both cool and a good sounding way to approach mixing, especially if your references were mixed analog themselves.
One thing that’s been expressed to me by people without an analog background is a confusion on how to use some of the analog plugins. Stuff like eqs and compressors are pretty straightforward, even if the controls aren’t as clear as on your stock, digital options. But stuff like preamp and console emulations? What are those and where do they go and how do we use them effectively? That’s what I’m going to address in this article. How to set up your plugins (in this case our Slate plugins) in order to replicate an analog signal flow and, ideally, that analog mixing sound.
Let’s start with how sound gets into your computer. It goes through a microphone, into a preamp, and then either through a console and eq and compression and whatever, or directly into your daw. Before computers, that termination point would be a tape machine, which by the end of the tape days was a 2″, 24 track, washing machine sized behemoth, complete with its own intern to push the buttons! Let’s recreate that with our Slate plugs and an ML-2 microphone.
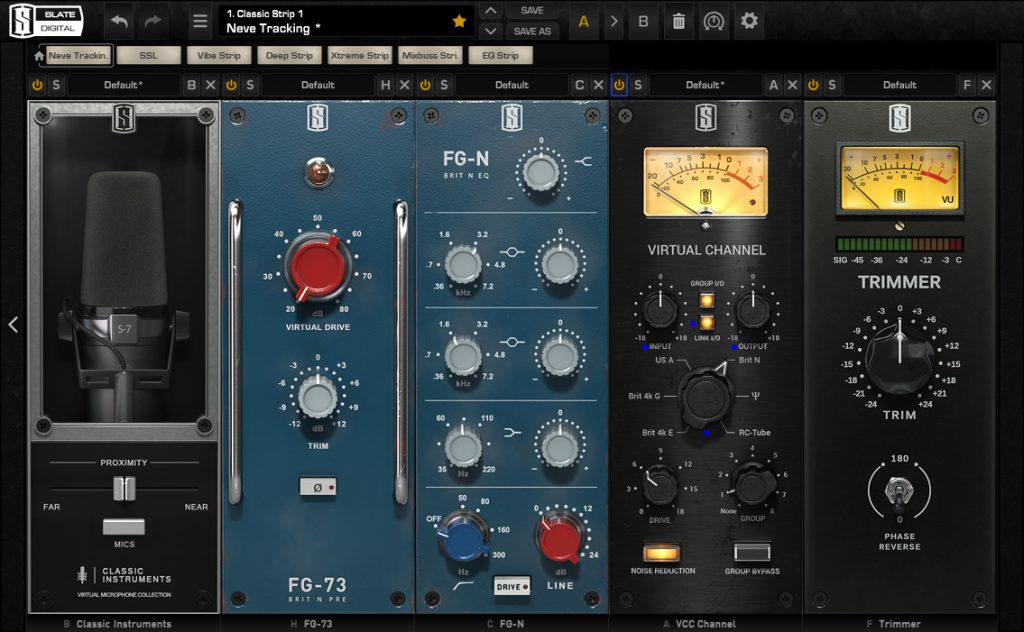
You can see that we’re starting with the microphone model and then sending that into a preamp model, in this case a recreation of the Neve 1073. Preamp models are harmonic generators (you can find them in the harmonics menu to the left). Analog gear, in general, isn’t completely analogous. What I mean is that, while the sound pressure variances are the same as the voltage variances are the same as the magnetic variances, each piece of gear imparts its own sound to the signal, in the form of harmonics. Even with super transparent modern gear, your Focusrite preamp is going to sound different from your Presonus preamp, which will sound different from your Behringer preamp, and all of those are going to sound way different from your Neve preamp, which goes back to the 70s and is one of THE sounds of rock. Neves, by the way, despite being known for their sound, were designed to be as transparent as possible, to the point where years later Rupert Neve himself refused to even acknowledge that there was such a thing as a “Neve sound.” With the gain set to 0 on the 1073 (which Slate calls the FG-73), you’re basically not getting any tone out of it. You have to turn up the knob, which for me generally is halfway, before you start to hear anything, and even then it’s so subtle that half the time, even using the plugin for years, I just kind of shrug and do it, knowing it’s doing something. With the plugin also being for harmonic distortion (Neve pres are known for having really cool sounding distortion), you can push the gain more until the signal distorts. The red light will tell you when that’s happening. Pushing a snare right to the point of distortion on the preamp module sounds amazing. You get a bit of compression from saturating the circuit, and the crackle of the distortion blends well with your stick crack.
Next up we have a choice: The console channel model is designed to model what happens when you pass signal through the channel strip of a console. Where this goes in your signal chain depends on how you conceptualize your eq and compression and whatever. If you want those to be inserts, then you’d put them before your virtual console. If, however, you want them to come from the direct outs, then you’d put them after your console. Does this make a difference in the sound? Yes, but it’s subtle, just like all of what we’re doing. While you can mix and match the various EQs like you would with outboard gear, I find I get the best results by making sure that I have the same console model on all of my tracks. The virtual console plugins have eight groups, and changing the settings on one plugin in the group will change them on all. I’ll put all my instances of the plugin on one group and then audition the different consoles. The effect is far clearer when done to all the tracks. If you want to get experimental, you can group together your instruments and pair them with different consoles based on your sound preference. Have your drums go through an API, guitars and bass through a Neve, vocals through an SSL. To my ears that sounds a bit disjointed (same with the groups on the tape plugin). Your console is one of your constants when it comes to recording and mixing analog, so I like to maintain that cohesiveness. You’ll also notice on the console plugin that there is a separate drive control. This adds gain neutral drive to the group, that adds in more glue and harmonic character. Can you add more drive to the group using your linked I/O controls? Yes. So why have a separate knob? More drive? I dunno. I typically leave it at the default.
Finally, after the console, we get to the tape machine.
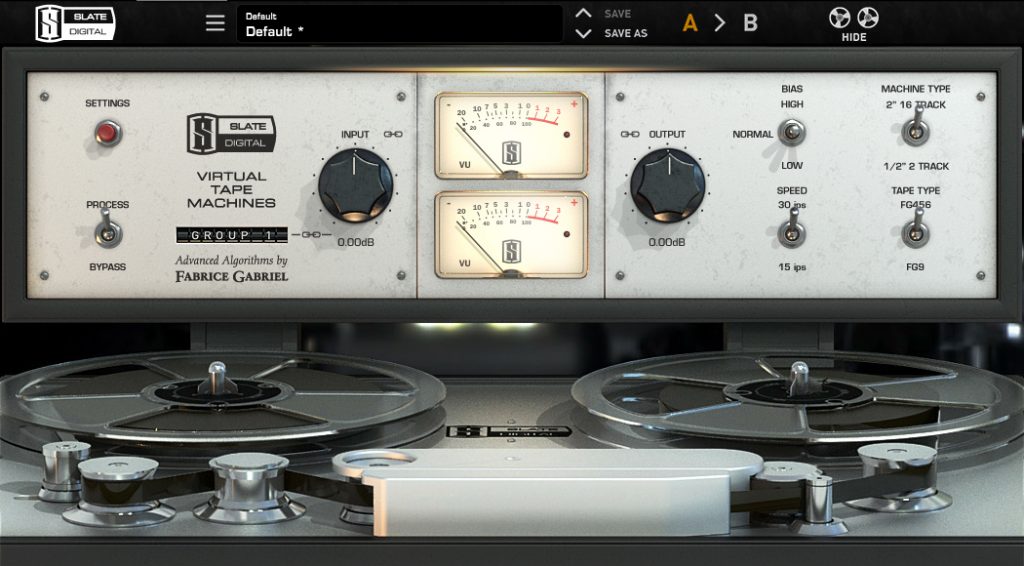
Like everything analog, the different pieces of modeled gear have different sounds they impart. For Slate, you have two tape machines: a 2″, 16 channel tracking machine, and a .5″, 2 channel mixdown machine. Why 16 channels on the tracking machine instead of 24? Fewer channels gives more dynamic range to the individual channels, since they have more space on the tape, so you’re less likely to distort or get lost to noise. The plugin also gives you two different types of tape, and two different tape speeds. These options greatly affect the sound that you’re getting, so it’s best to pair them to the vibe you’re after. 15ips is more indie than 30ips, but I like it on guitars. FG9 sounds more hifi. Like with the console channel plugin, you’re able to group different instances of the plugin together to tailor the sound to each group, but like with the console channel groups, doing so sounds weird to me. Additional controls to be aware of under your Settings menu are your Noise Reduction and Wow & Flutter controls. Noise Reduction lowers your tape hiss noise floor, while Wow & Flutter adds in some warbliness you get from not quite perfect condition machines and tape. Usually I’ll turn these all the way down, since I’m only after the character of the tape, not the hiss. If, however, I really want it to sound like I recorded to tape, that Noise Reduction is getting set at 0dB, and the Wow & Flutter is being left on. There are plenty of tape emulations out there, some more vibey than Slate (which is much more modern in sound than, say, the Waves ones). Find a tape plugin that works for the vibe you’re going for and run with it.
Now that we’ve hit tape, we’re at the analog equivalent of getting to your DAW. You’ll notice that we did some EQ and compression on the way in, and that we’re going to do more of it on the way out. When I’m recording with EQ and compression, I tend to focus more on fixing the individual sound sources than on blending things together. If there’s a bad resonance in the kick drum, I’m getting rid of it during tracking. I’ll worry about masking with the bass during mixdown. That’s how I approach EQ and compression here. Corrective and basic tone shaping before the tape, blending the sources together after. I’ll load up another instance of the VMR, and again make sure that I have my VCC channel plugin on everything. Maybe I’ll use a different console, maybe the same. The point is we’re going out through a console, and that’s going to again impart its own flavor to the sound. I’ll do my processing before the console channel, since it’s either going to be directly between the tape and the console, or it’s going to be an insert. Once I’m finished with that part of the mixing, I’ll start bussing.
I like bussing my instruments together for processing. I like compressing my drums as a whole, blending all my bass inputs before processing, putting a limiter on my vocals just in case the layers get a little too loud. On a console you can do this too, and doing this imparts its own flavor distinct from that of the channels. The VCC Mixbus plugin approximates this. Now, technically the mixbus plugin is for your stereo mix, but in my mind I typically want my busses to sound like busses, so I’ll start with putting an instance of this on my busses. The groups match with the console channel groups, so you can switch between the summing as you audition consoles. Once I’m done with my busses, I’ll put another instance of the mixbus plugin on my stereo bus (which is where it’s meant to live) and do my stereo bus compression and EQ on that. I put the mixbus plugin before any other processing, since the audio is going to be summed before you compress it. While you’re technically not imparting sound as you’re summing (I don’t know if plugins can do this yet) you’re still getting the sound of summing through the various consoles, so it’s a final recreation of what it sounds like to mix through a console. After your stereo bus processing, you end with your tape plugin, set to the .5″, 2 channel machine, and then you’re done!
So to recap, it goes Mic -> Preamp -> EQ/Compression/Whatever -> Console Channel -> 2″ tape -> EQ/Compression/Whatever -> Console Channel -> Mixbus -> EQ/Compression/Whatever -> .5″ tape. Whew! That’s a lot of saturation! But that’s also what an analog signal flow from tracking to mixdown looks like. Now, is all this necessary or even recommended? No! I did this on one record and it was so tedious, not to mention CPU intensive, that I stopped doing it! Or, rather, I do half of it. I’ll start with the tape and do the mixdown half. Do I really need two instances of the console saturation? No. I might not even need the mic or preamp, unless I want that flavor or am using one of the Slate mics. And since I have a summing mixer, I don’t need the mixbus plugin unless I want to add some extra fun. At the end of the day I love analog modeled plugins. I love how they sound, and the flexibility that comes with having them in their digital form. I can create great mixes without having to go through all that work to recreate a complete analog signal flow. It is important, however, to understand what that signal flow is. Not just if you end up doing analog mixing, but also to understand where these plugins are coming from, and how to make the most out of the plugins you have. So go and try doing a full analog mix using your plugins and see how you like it. Maybe create a template for easy loading (since that’s a lot of plugins to put together for every track). The extra saturation may suit your style, and if you’re struggling to get things to sound like they did in the bad old days, well this is a good place to start. Happy mixing!