
Next up in our Eventide series (got the licenses for free, not gonna keep, assume what you want) we’re going to be looking at their H9 plugin bundle. If you hadn’t guessed, I’m not really comfortable getting things from companies. Like, there are too many expectations attached them, mostly from myself. While I want to be as honest as I can be, there’s still this pressure to be extra thorough, to give as many second chances as I can for things that I don’t like, all with this gnawing in the back of my mind that, regardless of how it affects what I write, getting something directly from the company is going to affect what I write. The same could be said if I spend money on something, I guess. Ideally, I’d get loaners. Good middle split, though even then there’d be worries about maintaining relationships and ugh. Whatever. What is is, and now I’ve got this as-thorough-as-I-care-to-be review of an expensive plugin bundle by a company that’s been really kind to us. So, here we go…
The H9 bundle is a collection of plugins that recreate different effects found in Eventide’s H9 Harmonizer pedal, with a bunch of handy customization features that let you really push the unique sounds to their limit. The effects themselves, while some are ideal for mixing, are overall strange and unusual enough that, for many, their utility is in the creativity and production side of the process, rather than the more subtle mixing side, which is my primary focus. I like plugins that are versatile., that can work well by hiding in the background but also can get crazy if I need crazy. Crazy is one of those things where I find I seldom need it, but when I do I really do. Like if I’m making a kicksplosion. Speaking of, take Blackhole for example:
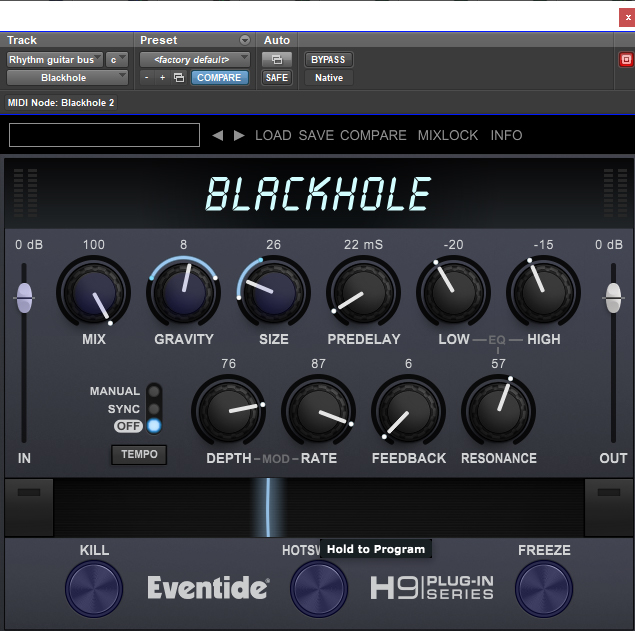
Blackhole is insane. I don’t even know how to describe what it is supposed to be. To call it a very big reverb is missing the point entirely. Sure, it technically is a very big reverb, but the potential for sound goes far beyond the expected “paaaaaaaaaaaaaaaaaaaaaaaaaaaaaaaaaaaaaaaaaaaaaaaa.” Just adjusting two parameters: “gravity” and “size”, with mix set to 100%, I can get a kick drum to sound like anything from Blade Runner to a pewey electronic hit with just the reverb. No dry signal. The Gravity knob is the equivalent of the reverb’s decay, though with a twist. Positive numbers (to the right) are your typical reverb decay fun, while negative numbers (to the left) are closer to a reverse reverb. No more having to print, cut, and reverse to get that fun 80s snare effect. Size is a bit more self-explanatory. It is the dimensions of the space, which Eventide says ranges from “cartoonishly small to cosmically epic.” I guess that’s where my “pew” kick is coming from. Can I get a cool, usable reverb for a mix out of this? Sure. Some tweaking and I’ve got something that doesn’t sound real, but also doesn’t sound bad. Other controls are modulation speed and depth controls, high and low eqs, an additional resonant adjustment for those eqs, and feedback. Feedback works like other feedback controls, sending the reverb signal back into the plugin’s input, but with a cool feature called “Freeze” at the very extreme. Freeze shuts out all incoming signal from the reverb, letting the audio continue to play unprocessed while the reverb trails off. Way easier to automate, not to mention cleaner, than mute automating your reverb sends.
The final control of note is the Ribbon function, which is a squiggly line at the bottom of the plugin. This allows you to control different parameters at once, within a set range. If you want Gravity to increase and Size to decrease at the same time, set your ranges and automate your Ribbon. This not only clears up time, since you only have to automate one thing, but also gives you lots of creative potential, since you get to hear how things change simultaneously, instead of building each parameter on top of each other. Ribbon is a feature found in all the plugins, and is key in unlocking the creative potential of the plugins. See the blue lines on the parameters? That’s the ribbon range, and I can set the ribbon to control every parameter with a semi-easy drag of the little white and blue dots. It’s a very powerful feature and key to unlocking the full creative potential of the plugins.
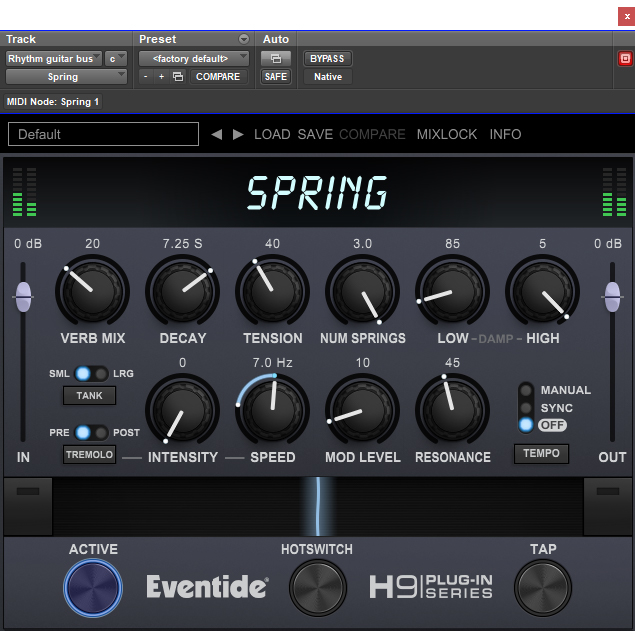
Next up is Spring, and in this we find something that has a lot of both subtle mix and more extreme creativity. These are the default settings (as evidenced by the “Default” preset). I threw them on a guitar bus, didn’t even mess with the mix knob, and yep, that sounds like a spring reverb. Like a great spring reverb. I don’t think I even need to adjust anything. There’s the warble and echo, the tone, the quick decay. I love it! Decay can be measured in seconds or in beats depending on sync. Tension simulates different string, um, tensions (I guess descriptive parameters are ideal). Lower tension settings give you a darker and less echoy tone. Higher ones the opposite. Likewise, Num Springs simulates how many springs are in your tank. More springs and you get a smoother decay. You have two different tank sizes to choose from. Small gives you a sound that’s more focused on the upper mids, whereas large is smoother with a less pronounced echo. I’m going to go out on a limb here and say that small is your classic guitar amp verb, and large is your external spring box. The other major feature of the plugin is the tremolo.
Tremolo is volume modulation, and is a classic guitar effect that produces a waviness to stutter to the sound. Pairing it with a spring reverb makes sense. Lots of guitar amps have had both reverb and tremolo. You’ve got your standard tremolo settings of intensity (how significant the volume changes are) and speed (how fast the changes happen), as well as mod level (adds a subtle chorus effect). The cool part about this tremolo is how it interacts with the reverb. You can set the tremolo as pre or post, meaning you can apply it either to the sound coming in, or to the reverb itself. The added utility of having them easily switchable as opposed to having to drag a plugin between a dry and wet track is so, so nice. And, to be honest, I’d never thought of applying a tremolo to a reverb as opposed to my dry source, my familiarity with the effect coming from a guitar pedal my cat peed on years ago. Tremoloed reverb sounds cool! And because it’s contained within the plugin, you know what that means…. It’s automatable!!! I like this plugin a lot. It also has the Ribbon, so I can do all sorts of adjustments at once. Spring is a win!
Ok, so we have one weird creative reverb, and one amazing how can I live without it reverb. And then we have ShimmerVerb. ShimmerVerb, as the manual claims, could be considered “heavenly”, which is odd, since to me it sounds downright demonic. Or, rather, it does when you turn down the pitch shifting. The plugin is a combination of reverb, pitch shifting, and feedback, and this combination creates a unique, sometimes good, and sometimes too much sound. My big criticism, which I think is going to be a theme, is that the decay and delay times are too long. I’m having trouble getting it to sound good on vocals, but choking everything up (delay, size, feedback) and detuning the pitch a little makes it sound amazing on guitars, like a roomy plate. On vocals, in addition to the more pronounced swell, the pitch gives you a chipmunkesque quality that’s really limited in its utility. If I could get the reverb to sound on the vocals like it does on the guitars, I’d be happy with it, but I can’t, and if you read my article on the SP2016, you know how much I like being able to dial things in quickly.
So how does it work? You have your decay time and your reverb size. Size adds a delay to the reverb and gives it a spacier feel. Next you have your two pitch shift controls, which shift the feedback signal before it gets sent back into the reverb. The delay isn’t a predelay but rather a delay between the initial reverb and the delayed signal. Finally, the low, mid, and high determine the level of the frequency bands of the pitch shifted signal. And feedback is feedback, with a pitch kill (that gets rid of the pitch shift but also keeps the reverb’s feedback at infinite), and freeze (which keeps the input signal from going in to the reverb, but also has an infinite feedback). Like with Blackhole, I can see this as having a lot of utility in sound design, as opposed to the music focus that I’m using for my reviews (being that that’s my focus). Actually, come to think of it, I guarantee I’ve heard this used in some sci-fi movie before. So, if you want a creepy sci-fi/horror reverb? Go for ShimmerVerb.
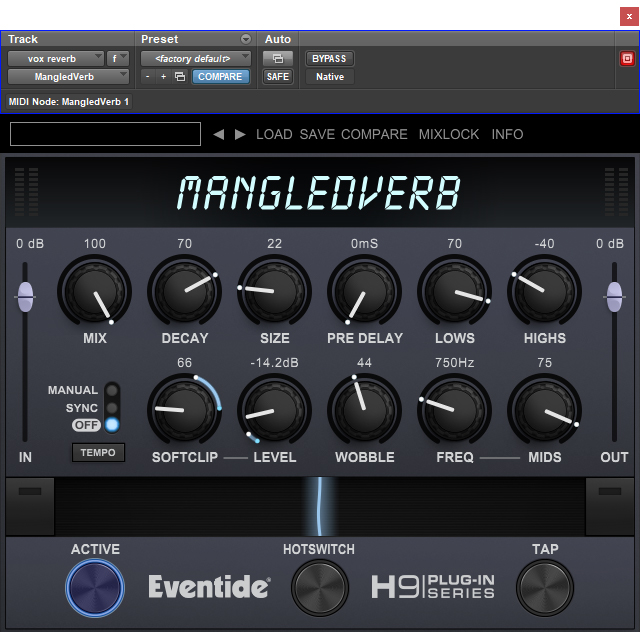
Speaking of creepy sci-fi/horror, if ShimmerVerb is there to build tension, then MangledVerb is the jump scare. MangledVerb is a reverb with a distortion phase added to the signal to create all sorts of gritty, glitchy, messed up tones that range from an abandoned factory to a dog bark. The combination of distortion, modulation (wobble) and the uniqueness of the size knob makes this a cool effect that’s also suitable on a wide range of sources. For my messing around with rock song, I’m finding it sounds excellent on drums (room mic), guitars (lead), and vocals. It’s definitely effect heavy and not going to be my go to reverb, but the fact that it sounds so cool on so many things makes me think it’s going to stay close at hand. Let’s go over how it works. Decay controls the length of the reverb tail, though a shorter decay can give you the effect of a reverse reverb, which is an interesting effect to play around with. It sounds like pumping caused by side chaining the vocals to compress the reverb (which, itself, is a cool thing to try if you need a strong reverb but it’s covering up your dry signal). The result is more like an echo than a traditional reverb. Longer decays are more traditional in their decay, so there’s that versatility. Size controls, again, the size. The manual doesn’t go into any more specifics. What it sounds like is both the apparent size of the simulated space but also the position of the mics, and that’s something that I don’t like. I’m finding with these reverbs that a lot of what I choose isn’t due to the sound but rather the delay. I need everything to fit musically, and I can’t if there’s too big a delay or build up until I get my reverb sound, even if I like the overall sound that it gives me. So, separate knob for mic position please?
With that in mind, I start with size and then set decay. I’ll set a predelay if I need a little space for my dry signal, but I’ll then go and adjust size again to make sure the delay fits. Next up on our signal flow diagram is the EQ section, to sculpt the reverb before it goes to the distortion stage. We have a high, low, and selectable mid eq. Doing some quick adjustments (especially that mid band) really helps make this reverb go from fun to amazing. Making things subtle actually helps accentuate the interestingness of the reverb characteristics and the fun added by the distortion. Next I’ll set the distortion and the level. I prefer more softclipping to overdrive, but that’ll depend on the source. More extreme is good for effects, more subtle is good for overall uses. Finally I’ll set wobble, which is both modulation depth and rate. Then I’ll blend it all in and have something that sounds like a reverb (good), works with my song (good), has a cool and unique quality (good), and has the flexibility to do something really crazy (good). I like this plugin.

Tricerachorus is more than just my favorite name for a plugin, but also a really good plugin! As the name implies, it’s a chorus with three voices, meant to emulate the chorus pedals of the 70s and 80s, with some of Eventide’s detuning added in for extra effect. Now, I’m not usually a chorus girl, since I’m not a guitar player, so going in without any expectations I was immensely impressed by the sound I got out of this plugin. Even leaving things on default it worked well on everything, from guitar (lead/solo especially) and vocals and even drum room. Wait, do I actually like the sound of it on the room better than without? What is this sacrilege!!! This plugin is a win and sounds way cooler than the other chorus plugins I have, certainly out of the gate, but how about when we start fiddling?
The voices are split LCR with individual depth controls for each, and overall rate and delay I’m going to start with the depth’s at their 50 default and mess with the rate first (with the envelope rate off, we’ll play with that later). Rate controls how quickly the modulation occurs. I like lower rates, unless I’m after something silly. Next up is delay. Depending on your delay time, you’ll get anything from flanging to your standard chorus to a slap echo. I settled on 8.65ms, which is in your typical chorus range. So far this is still sounding amazing. After that it’s choosing chorus or chorale. If you click the thing that says “Chorus Mix” it’ll change between that and Chorale mode. While Chorus mode is definitely a pedal emulation, Chorale mode adds additional LFOs to add more “complexity” and “richness” (Eventide’s adjectives). What does it actually sound like? Chorale gives me more separation and clarity and width. Now I jump over to the depth of the individual voices, messing around until I have something that I like. The differences here are subtle, so I’m finding myself thinking in terms of width. Less chorus on the sides gives me a more focused sound. The plugin automatically adjusts for volume and stereo evenness, so all we’re messing around with here in vibe, and I like that. Next we jump to the bottom section where we get to play with detuning. This gives us extra separation and character from the sound. The detuning knob controls both the L and R tune, and does so inversely: tune down L and you tune up R. There’s also a blend knob to get the right level of detuning (and the extra chorusy effect that adds).
Envelope mix is another cool feature that helps Tricerichorus stand out. It modulates the chorus mix parameter based on the attack of the signal, so that different parts of the signal have different levels of the effect. This is something I’ve taken the time to automate in the past, so having it done automatically for me, and more accurately than if I were writing it myself is really cool. The envelope rate knob acts the same way, but adjusting the speed of the rate based on the envelope of the signal. This gives us dynamic control over the character of the effect as well as the level of the effect, and is such a fun addition I’m surprised more plugins don’t do this (more Eventide plugins do this, and I love it). Finally we have tone, which adjusts the relative frequency content, either rolling off high or low frequencies. Oh, and there’s swirl, which gives it the sense of moving from left to right, based on your rate parameter. This plugin is complicated, but also easy to get a good sound out of. I don’t think, in all my messings around, that I came across a bad sound. This is a double edged sword, of course. It makes it harder to decide on the right sound, but also means that whatever sound you decide on is going to be great.
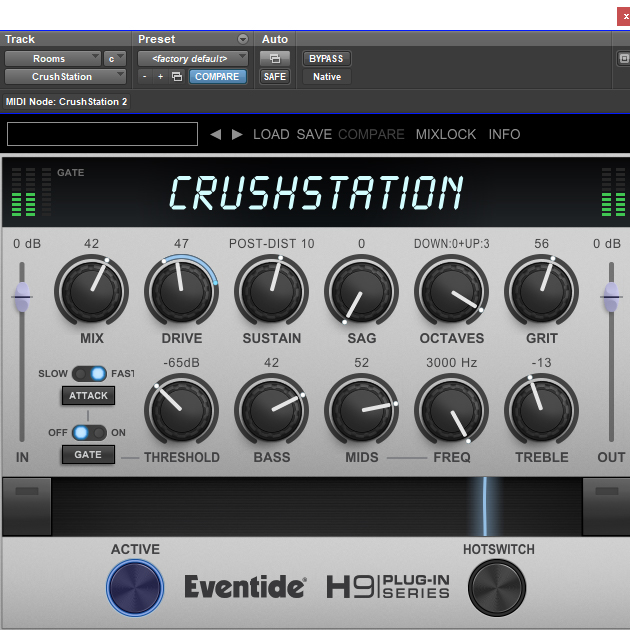
No plugin collection is complete without at least one distortion box and this be it for the H9. Combining both a distortion algorithm with an octave adjustor, the plugin can accomplish near unlimited character, providing rumbling lows to sizzling highs and am I actually writing copy for Eventide? Has this review finally broken my brain? There are just so many plugins. They all look the same. Is that a good thing? I think it is. Uniformity and ease of use, especially since, while they’re modeling the sound of analog equipment, the visual layout isn’t so precious as to sacrifice usability in the computer (she says, knowing full well she has to review the H3000 eventually). The thing is, I like plugins with an analog flair, which these plugins do have. I like that I’m looking at knobs instead of numbers, and I like that they’re responsive and easy to set. So, review of the interfaces somewhere in the middle of the overall review? Excellent. Oh, right, I was talking about a distortion box.
This one is a bit confusing at first, simply because of the uniqueness of the parameters. Like, what is pre-dist sustain? What is sag? This is what manuals are for. While I was able to turn things and get a good sound, it’s a bit harder to do that from the get go than, say, with Spring. Nevertheless, I was able to get something sounding good. This setting is what I put on, you guessed it, my drum room. When I record at The Vera Project, I like dangling an omni mic down an ADA wheelchair aluminum elevator shaft. It gives me a nice ping and a really distorted sounding character that I’ve never been able to replicate with a plugin. Because real spaces are cool. This plugin comes close. I’m able to give it rattle and bark, without having to wrangle the reverb part of, say, MangledVerb. This means I can, like in this case, use a different, more natural sounding reverb to get this particular sound I’m after. In this case, Eventide’s SP2016 reverb.
So how does it work? First, you crank mix to 100 so you’re just hearing the sound of the plugin. Then, you adjust the distortion. I like how these plugins are laid out in a logical, left to right manner, when it comes to adjusting the plugin to suit your needs. Another plus to the UI. Thank you so much, Eventide, for putting so much effort into making these plugins easy to use, because they are also rather complicated. Next is sustain. Sustain on Crushstation is a compressor that’s either applied to the pre or post distortion signal. Paradoxically, it feels like the pre-distortion compression makes things sound more distorted, but it may be that that gives a greater, um, sustain to the signal. The difference between the two is subtle, but significant enough that I’ll choose one or the other before deciding on the overall value. Next up is sag. The manual says it’s “Inspired by power rail sag of poorly designed tube amps and the dead and dying gear of times past,” which translates into a more sputtery, broken up sound when turned up. Not quite glitchy, but also a little glitchy. As you can see, I left it turned down. Grit increases low end pre-distortion to add more, um, grit. I do love when plugin parameters are descriptive. So, now we get to octave. Octave blends in pitched up or down (or both) signals before the distortion and compression to give additional high or low end information that changes the character in ways different from an EQ. The effect is anything from a subtle brightening/darkening (you can see here I’m boosting up three octaves without any lower octaves added) or some extreme, obviously octaved effects. My big criticism is that, if you want to blend in different octaves, you need to use the extreme of one. In setting this effect, I really wish I could blend in down 5 and up 3, but the best I can do is down 9 and up 3, or up 9 and down 3. Neither of which sound right. Maybe for the next version we can have this split into two knobs. Finally, we have a noise gate that’s triggered by the input signal but is applied at the end of the signal chain. This is there to remove some of the unwanted, um, noise (again with the descriptive parameters!) that can be added by the drive. In playing around, it can provide a cool effect, but I decided to leave it off. We also have a basic EQ section, like we find on the other plugins. Once I have my tone dialed in, then I back off the mix knob to get the blend that I want. Overall this plugin isn’t what I’d consider to be subtle, but if you want a more extreme distortion effect with some interesting options available, give this one a go. Though, despite loving the sound, I don’t know if it’d end up being the first thing I go for, simply because it does get too extreme.
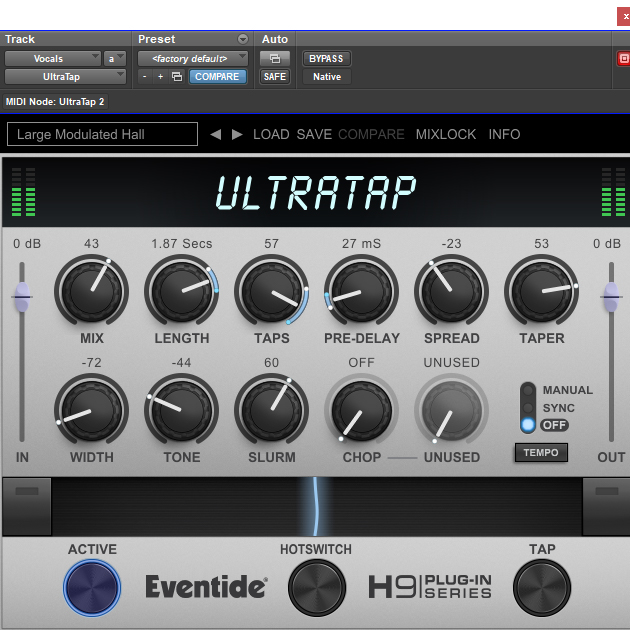
Upon opening Ultratap, I was ready to dismiss it as yet another too extreme creative weirdness effect that has no real utility in my mixes. After all, the default settings are crazy, with seemingly endless, undulating, sputtering delays, wide and intense and insane. How could anyone actually do anything with this. But, before talking about how much I don’t like it, I decided to dive into the presets. The picture above is the Large Modulated Hall preset. I didn’t mess with it at all, instead slapping it on a vocal and you know what? It sounds like a hall reverb, though not like your typical hall reverb. I can’t put my finger on it, other than the fact that it was created differently than a hall reverb plugin, thus giving it its own character. So what about this gives us our hall sound? I think it’s the Slurm, to be honest. That and the Taps. Taps determines the number of, um, taps that are in the signal, up to 64, which is a lot of taps. Slurm adds modulation and detuning and diffusion to reduce the attacks of the taps, giving us a smoother and more smeared sound. Mix the two together and you have a quasi reverb! This is cool! Of course, then we move into the crazier effects and I’m lost again. Length determines the time in which the taps are spaced out. Spread groups the taps together, either putting them closer to the source audio, or farther away. This can give a swelling effect that has a lot of creative potential. Width determines the panning of the taps, alternating from left to right. Taper controls the relative volume of the taps. Negative values have the volume increase towards the latter taps, with positive values having the volume fall off (like a regular delay). Chop is a tremolo applied before the tap section, with all sorts of LFO settings to play around with. My overall impression of this plugin is that it’s one of the more complex ones in the bunch, which is both good and bad. Good, in that it offers a lot of versatility and creative potential. Bad, in that I’m still having a hard time figuring out the best way to use it. Still, the potential is insane, and we like insane.
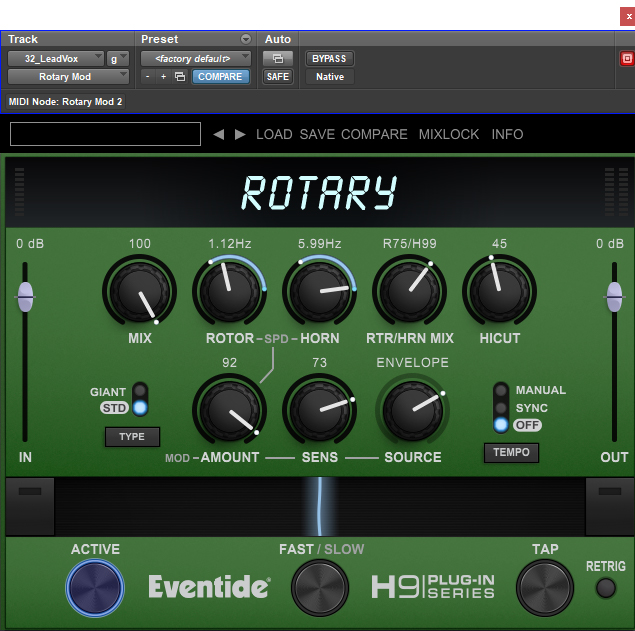
Rotary, if you hadn’t guessed, is a simulation of the unique and cool effect of a Leslie speaker. While awesome on everything, you’ve probably heard it on organs. That warbly back and forth you hear on all sorts of classic genres? That’s your Leslie cab. Eventide’s Rotary has some unique features not found on the actual units. For one, both the low and high horns are able to operate independently of each other, meaning different speeds for a massive range of effects. You can also blend the relative levels between the two, which technically you could do with the actual cab, since it’s pretty standard to put three mics on it, but it’s still nice to have it in a single plugin. Ease of use is so key, so being able to blend everything quickly is wonderful. We also have two different cabinet types to choose from. Standard sounds close and boxed in, while Giant gives us more space, and you can hear the rotary effect more clearly. I like Giant. Finally, we get a modulation section to add an LFO signal to the rotor speeds, giving us additional effects to play around with, as well as modeling the nonlinearity of an actual, mechanical speaker. There are a plethora of sources to choose from to trigger the LFO, including the envelope of the incoming signal, which sounds like the speed, um, speeds up towards the end of the signal which sounds really cool, and gives us a lot of extra movement and creativity to play with. The one drawback of this plugin is that it sounds a lot grungier than, say, Pro Tools’ version, as well as less wide. The grunginess covers up the phasiness of the effect a tad, but the lack of width and separation is annoying, meaning that you’re gonna need different rotary speaker plugins to make sure you get the effect that you like. Based on the controls of this, I wish it were my go to don’t need anything else (like Spring is turning into), but it’s still worth having in your toolkit.
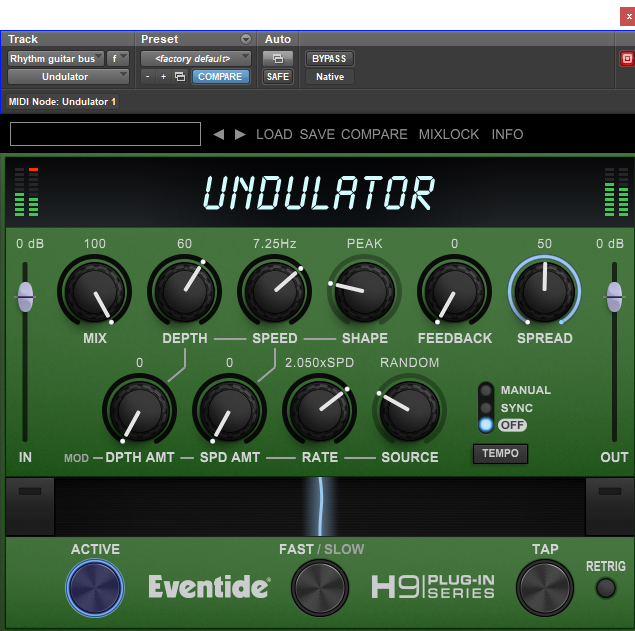
The Undulator is another one of the weird/creative plugins. The manual says it’s modeled after a classic effect from one of their most sought after units, so I’m going to trust that it gives a faithful recreation of the effect. What it is is a combination of delay, tremolo, detuning, and who knows what else in order to get something that, well, undulates? It possesses the same LFO modulation approach as Rotary, affecting the depth and speed of the tremolo. There’s also a feedback control that affects the duration of the effect, and here is my major criticism. The minimum duration, as far as I can tell, is far too long to have the versatility I’m after. When testing these things, I like to have short decay times, so I can hear what’s happening without it getting muddied up. I like the delay, the back and forth, and the modulation, but I can’t think of a situation where this would be my go to because of how long the effect goes on. Definitely one for more atmospheric, slower songs, or for printed creative effects that you’re then going to further manipulate. I just don’t see myself ever using this in a mix. I did play around with the presets but still couldn’t find anything that made me go “A ha!” Maybe you’ll find it more useful.
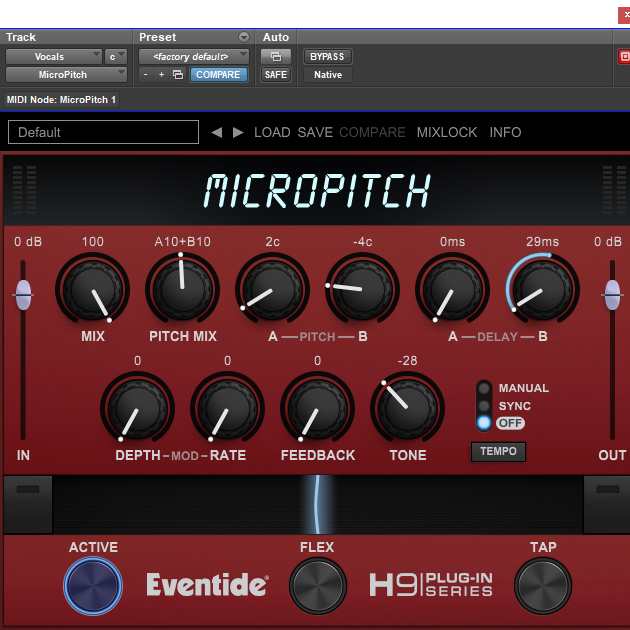
Micropitch is a pitch shifty delayey plugin that’s great for doubling. When I loaded it up on vocals I was shocked at how good the default doubling effect was. Now, I normally double everything, because you never know, so I had a double of this vocal already, and I have to say that I might even prefer using Micropitch over an actual double. Or, at least that actual double. Compared to the real thing, micro pitch was much closer in line than what the artist initially gave me for the main vocals. Like we’d spent considerable time getting the alignment and pitch as close as possible. Almost like we were using Waves’ Reel ADT, but clearer and more defined. And that’s just the default. The plugin has two voices, each with their own pitch and delay controls. Voice A gets pitched up, Voice B gets pitched down. You’re able to mix the pitches relative to each other, as well as apply pitch modulation and feedback to your voices. In playing around with the different presets, I’m finding a lot of interesting choruses that provide their own flavor than what you get with Tricerachorus, as well as some crazy delays that seem like they’d be at home with Undulator, but are closer to what I’d use in a mix, as well as giving me that fine control that I’m after. I like effects that can be big but also subtle, running the gamut of every possible use that I could have for them, at it seems like Micropitch is one of those. I’d like to go more in depth as to how I’m setting it up, but the level of complexity in this plugin as far as finding the right settings is a little too high for the amount of time I’m able to spend with it. Definitely one to start with the presets (which all sound cool and amazing) and work your way from there. Probably a good idea for all of these.

Crystals, upon loading, looks a lot like Micropitch. It has two individually shiftable and delayable voices, as well as a blend knob for both your overall mix blend, and the blend between the two voices. Crystals differentiates itself by having larger pitch and delay values, and a reverse delay time (I still can’t figure out what that means) to create all sorts of weirdness. You can make your audio high pitched and chirpy, or low and demonic, jumping around and cascading and all sorts of craziness. Maybe it’s because this is the last one I’m reviewing, but I’m finding this one to be the hardest to figure out (along with Undulator). I’m jumping through presets and, while the variety of the effects is jaw dropping, I’m not understanding how to get there. I can get things customized to suit my needs after finding a preset, which isn’t the worst thing in the world. It has some interesting sounding reverbs, and of course the effects have their own place (I was even able to find a place for them in my test mix, believe it or not). For this one (and Undulator) it comes down to ease of use. If I’m struggling to figure out the controls, after reading the manual and playing around with presets and getting weird and extreme and soft and subtle and I still can’t figure out how to make it sound good, let alone know what I even want it to sound like, when do I reach for something that’s going to work the way that I want it to work?
That’s ultimately my big criticism of this bundle. Are the plugins good? Yes. Do they sound great? Yes. Are there some I can’t live without? Yes. Do I want all of them? No. Why? Because I’m not seeing universal utility and some, despite an excellent UI, are just too complicated in what they do for me to get to work well without significant experience with them. But that’s ok. Maybe a plugin clicks for you in ways it doesn’t for me. Maybe you’re coming at it from a different perspective than rock mixing. I can certainly hear the creative potential that can be applied to other disciplines, both musical genres and post-production. Given all this, whether or not you should buy is a math problem. Individually the plugins cost $100, and the bundle costs $500, so as long as you want more than five plugins you should buy the bundle. For me, it breaks down as this:
Want:
Spring
Rotary
MangledVerb
Chrushstation
Might Like:
Tricerachorus
Ultratap
Micropitch
Don’t Care For:
Undulator
Blackhole
ShimmerVerb
Crystals
Meaning I’m almost at a buy. Almost. If you do happen to like crazier delays and creative effects and weird pitch shifting, then certainly pick it up. Personally, I’m probably going to buy Spring, and might pick up another, though I also might just wait until it’s on sale (which, if you hadn’t guessed, is a theme with my plugin reviews, since they invariably go on sale). Maybe one day I’ll find a use for Blackhole (haven’t done a kicksplosion in a while) or Crystals. Maybe Micropitch or Tricerachorus move to the Want category and it suddenly becomes a buy for me. In general, look into it, give the trial a try. It’s worth the time playing around. And maybe you’ll decide that you love it.
If you would like to buy the H9 plugin bundle, please use our affiliate link to support the site!

Lilian Blair is a producer, engineer, and audio educator in the Seattle area. She specializes in studio recording, mixing, and helping artist achieve their musical dreams.
www.lilianblair.com