

Ah Ozone, iZotope’s mastering suite. This one I bought myself. First, I got the iZotope Elements bundle for $50 during a December sale, and then picked up the upgrade for $100 during a summer sale, saving me $250! Always buy on sale. Ozone’s been around for a while, currently at version 9, and its improvements are evident. I first came across the plugin a few years ago in audio school, using it during our mastering project. I found it sounded good and was easy to use, but I’ll admit I was probably just stabbing around, still learning how to listen. I forget the version, but distinctly remember that, despite using a trial for advanced, there was far less that the plugin could offer. I mean, look at this!
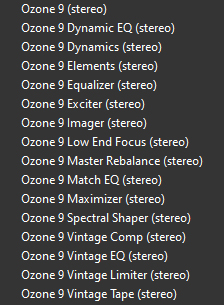
Simply by looking at the plugin list the power and potential of the software should be evident. Multiple compressors and EQs and a whole slew of other fun things to play around with to make our masters as mastery as possible. Mastering, being the final step of the production process, is all about polish and preparation to get the songs done and sounding good and competitive with other songs and ready for release. I’m not a professional mastering engineer, though I do get paid to do mastering, often enough that I kind of am? Wavering somewhere between Landr and your top end, all analog mastering houses. Where I fall on that spectrum I’ll leave up to you. I do know how to listen, and my clients are happy with the results. The point being, I’m probably the primary audience for something like Ozone. It’s both simple and advanced enough that I can dive in and fine tune in more esoteric means than your typical stock plugins can provide, while also remaining straight forward and quick to get something sounding good.
Like Neutron, Ozone’s plugins are housed inside a larger, meta plugin. While the Advanced version allows you to use the plugins individually, the software is meant to be used through the meta plugin, allowing you to easily switch between the different plugins in use, as well as use overall features, like in and out gain adjustment, stereo flip/mono, gain match (so your A/B can actually tell you what the plugin is doing), codec audition (so you can hear what things will sound like over streaming, which is really cool), dither (important), and access to a reference panel. Also like Neutron, Ozone is able to analyze the audio to create custom mastering templates based on the audio itself.
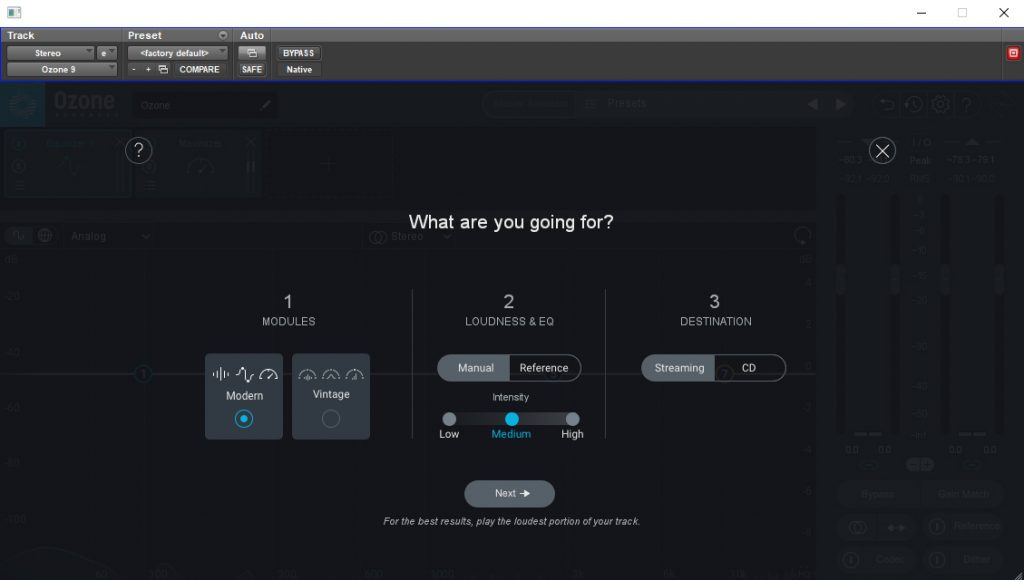
The Mastering Assistant panel gives you a handful of options to choose from. You first select which types of modules you want to use, between Modern and Vintage. As the names imply, Modern gives you transparent, digital processes, and Vintage gives you analog modeled vibey ones. As one would expect, Vintage changes the overall tone of the song much more than Modern, so here lies your big question that will determine the whole direction of your mastering gig. Does your client want you to make their work sound better, or do they want you to make it sound cooler? Do they want the original mix to be sacrosanct, or do you get to exert a little more creative input? How does the song itself want to sound? This step is probably the most consequential of our options. Next is the Loudness and EQ section. You can either set this manually, using the intensity slider, or you can use a reference track! I’ve tried both. For the reference, I used a song from the artist’s easier work and it didn’t quite get it automatically sounding like that previous record. This is exactly what I expected. My mix, the song, even their instruments, are completely different, so of course a simple auto master isn’t going to overcome those differences. I probably wouldn’t even be able to do so in the mix, let alone in the master. Still, it did get me closer to that character, especially in the highs. Like with Neutron, these software powered assistants are there to assist, not to do the work for you. It’s about creating an intelligent starting point and working from there, and I feel like Ozone accomplishes this. The manual section is used to select your target loudness, which they rate on intensity, with the destination determining the maximizer ceiling. So, how does it sound?
I’m experimenting with two songs, one a high energy garage rock song, the other still rock, but with softer moments and far more dynamic. On our fun garage rock song, both of them sound great. Vintage works better, as expected, bringing out the vibe and the grit of the guitars and making things sound hyped, while modern sounds like my original mix, just slightly fuller. The indie rock song ended up being the opposite. Despite my love of vibe and all that delightful (digitally modeled) analog sound, vintage ended up too muddy, burying the vocals, while modern was, again, closer to the mix, but a little too bright. I went into the vintage’s settings and boosted the EQ at 10k by 4.5. “But Lilian! Isn’t that a lot for mastering?” Generally yes, but this is for playing around. That one adjustment make things much more in line with what I wanted out of vintage. The problem is that neither option is anywhere near what I’d do if I were just going in and mastering it myself. That’s also a good thing, as it provides inspiration, but I also prefer building up everything myself, rather than having a good starting point. It’s easier to wrap my head around instead of feeling like I have to reverse engineer in order to figure out where I am and where I need to go. So will I use mastering assistant? Probably yes, actually. While it’ll take some time to get used to the new workflow, but the results were close enough, and also different enough, that I could see it pushing me in the right direction. The “Setting Dynamic EQ to Improve Maximizer Transparency” part alone is worth running it through the assistant, even if you chuck everything else it does.
In addition to the mastering assistant, Ozone comes with a large variety of regular, static presets. These range from general vibe/-ish presets, like Added Warmth and Thick Bass Beat, to a ton of very specific genre presets (though sadly missing punk; pop punk doesn’t work for all punk!) and even instrument bus presets if you’re doing stem mastering. These presets too have the same positives and negatives of mastering assistant. They can give you a good starting point, but it also takes time to adjust to where you are and where you need to go. In playing around with different ones, though, I found that I could get even closer to what I want than with Mastering Assistant. I’d imagine because they’re so genre specific, they can get even closer, while sacrificing being tailored to the individual idiosyncrasies of each mix. For the indie rock song, not surprising me at all, the Indie Rock preset worked the best, though the Vintage Rock one sounds really cool too, but also really different. How do I choose between two that both work and sound cool and also unique? Another reason why I like building things up from scratch and ignoring presets. Oh, and the individual plugins also have presets. Which all, themselves, sound good. Ugh, too many options! For the garage rock trio I chose the Garage Rock Trio preset and it sounds pretty good. A little too much low mid, but that can get cleared up with some dynamic EQ. And it’s done, and it sounds good, but is it really done? When is good good enough? There’s so much more available, certainly there’s a reason for that.
“Ok, Lilian,” you say. “We get it, you don’t like presets. How would you use it?” I’m glad you asked, rhetorical me! First, I’d start with Mastering Assistant, because I can’t get enough of that custom dynamic eq settings. In order to do that, I have to select Modern as my vibe setting. Then, I audition the individual modules to see what works and what doesn’t. I don’t like the EQ settings, so I’ll axe those and just have the dynamic eq and the maximizer. For this mix, Ozone says that I don’t need any compressors, because my mix is just so good (it lacks enough dynamic range to justify additional compression). Next, I’m going to go through my list of plugins and play around. I do want some EQ, so I’ll load up the vintage eq and do a bit of boosting of the highs with that. Now I’m building up my master, just like if I’m starting from scratch, but I know that, whatever I do, it’s going to hit the maximizer in a way that makes the loudening sound transparent, which is what I want. Next I’m grabbing the exciter, mostly to play around, and focusing primarily on the highs and upper mids. This is guitar rock, after all, so lots of energy and tone in those ranges. Finally, I’ll grab the imager to play around with the stereo image. Right now it’s fine, but I want the stereo image to pop a little more. A little widening in the highs (which also increases the volume in that range) and it sounds like what I want it to sound like. And now I’m done. Did it take a long time? No. Far less time than if I’d been doing it loading plugin after plugin and going on my own. And since I’m barely using any of the plugin decided settings, nor am I so good at mastering I can get it done in a snap of my fingers, it’s got to be the actual plugins themselves that are just that good. (I’ll note here that, for an actual paid gig I’d take more time and experiment with more options. Getting things to sound good with this program, even right, is easy, but getting things to sound their best is still going to take effort and experience.)
I guess now is the time to talk about the individual plugins. As I say above, Ozone comes with a lot of plugins. Way more than Neutron, and the ones that overlap seem to have far more nuance and complexity than their Neutronian counterparts. Let’s start with Dynamics:
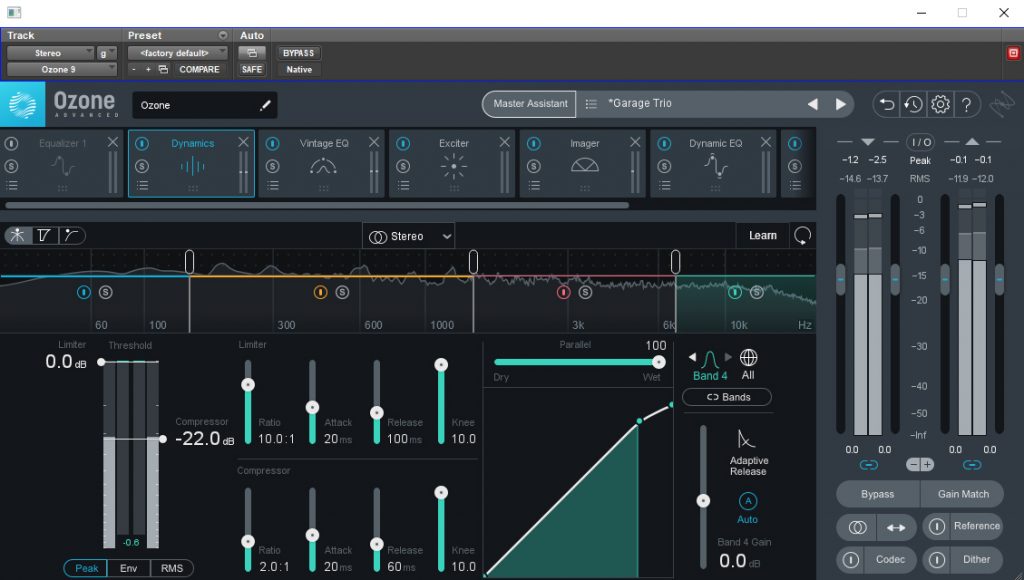
Well this is complicated. I think I’m going to say that a lot. It’s multiband (four), with a compressor and limiter section, that are parallel, with different detection modes, and optional auto release, and AHHHHH! Thankfully, despite all its complexity, iZotope has made it super easy to use. You see that big graph with the signal level and the dots on it? Drag the dots and you’ll set your threshold and your ratio. Or you can set things using the sliders just to the left. For so many options, its ease of use is refreshing. It’s transparent, even with extreme settings, and sounds good with pretty much every setting you use. This might even become my go to transparent compressor, though it does require a tad more delay compensation than Neutron’s. Hmm. Decisions.

Dynamic EQs are really fun. They’re sort of a combination of an EQ and a multiband compressor, but instead of signal level triggering adjustments in envelope it triggers the gain of an EQ filter. This gives you a different and more focused sound than traditional multi-band compression, while allowing you to be surgical in your cuts without having to sacrifice overall sound like with a static EQ. The quintessential example of using a dynamic EQ is in reducing the level of the high hat in a drum overhead. You find the offending frequency and put in a dynamic cut, and then when the hat is hatting it’ll reduce the gain of that bell, but not when the other elements are playing. Another great use is for de-essing vocals. I actually prefer a dynamic EQ for this, as the traditional compressor can get a bit too harsh. When it comes to mastering, what you’re after is the ability to handle incidental frequency issues, rather than the overall ones you’d use a traditional EQ for. Stuff like too much high hat or too harsh vocals. Because the dynamicness can be applied alongside a traditional boost, you can bring out the high end while letting the audio pull that boost down so as not to overdo it. And there’s that aforementioned auto adjustment to keep the maximizer transparent that I absolutely love.
How does this work? You have your EQ points that are drag and drop, just like the normal EQ, to set your frequency and bandwidth and boost or cut range. The -4dB cut in the above image doesn’t meant that there’s a cut (the white line is the actual EQ curve). What it does mean is that this is the most that will be cut as the signal goes over the threshold. If you look to the left, you’ll see the blue +/- number. That’s the actual amount being cut, because the threshold is set to only barely trigger the dynamic EQ (otherwise it’d be engaged all the time). In addition to the threshold, you also see other compressor style controls, like attack and release. Auto Scale adjusts these for you, based on the frequencies you’re adjusting. Finally, those little arrows by the numbers tells you whether or not you’re adjusting a cut or a boost. Switch it to the up arrow, and the full cut will be applied, with the signal dynamically reducing the amount cut. Good for when you need to emphasize elements. Dynamic EQs can be intimidating, but their utility is vast, and iZotope has made theirs both visually and functionally simple to use. And it sounds great!
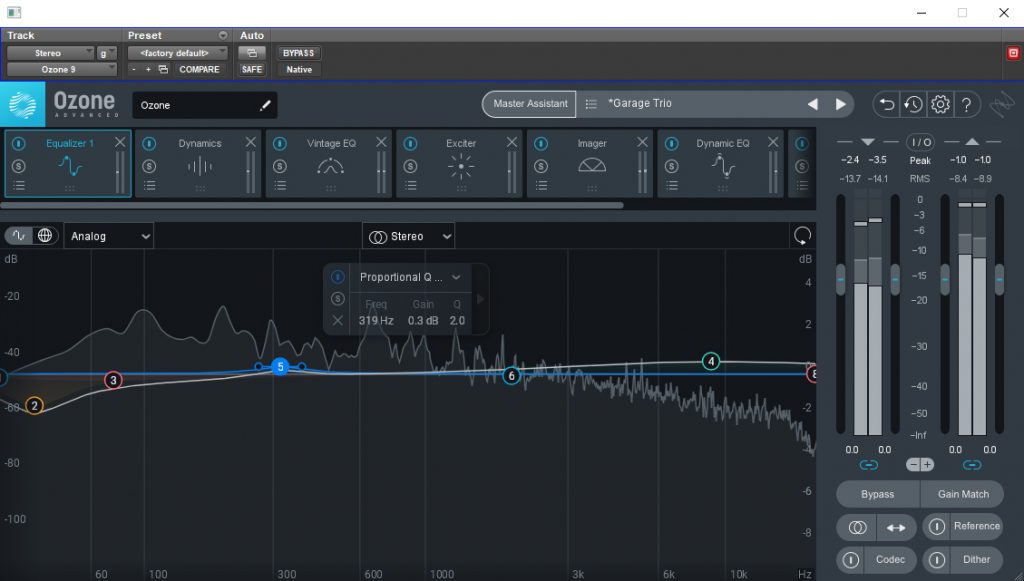
We’ve gone over the dynamic EQ, but what about the regular one? Ozone’s EQ operates like a lot of modern, digital EQs do. Our EQ points are easily adjustable using the little dots on the screen. Drag them around to select the frequency and gain amount, and then adjust your bandwidth with those little side dots, or your mouse wheel. This ease of use really helps with dialing in the changes you want, and even the minute ones used in mastering don’t take that much finagling to get right. The other big bonus of this plugin, which is hard to demonstrate in a picture, is the sheer number of filters available. You can set your EQ to have different bell (proportional, regular, and band shelf), shelf (analog, Baxandall, vintage, resonant), and pass (flat, resonant, brickwall) filters, each with their own utility and character. You can even choose between linear and minimal phase processing, as well as stereo, mid/side, or left/right. Nice looking, clean sounding, easy to use.
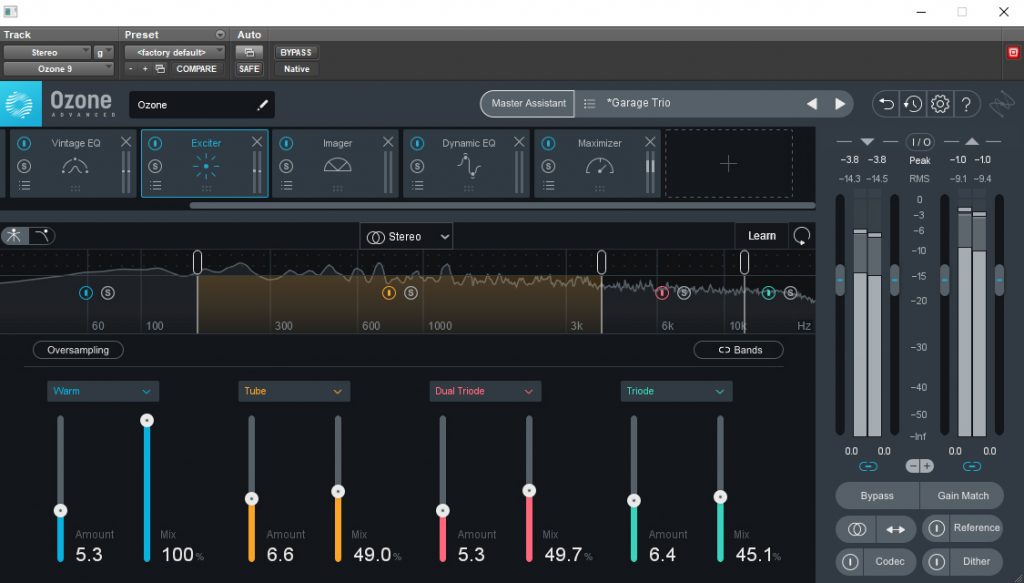
Next up is the exciter! Woo! Ozone’s exciter is quite different from Neutron’s. We’re lacking the algorithm blend tool, which is a bit of a shame, but are compensated with not four but seven whole different harmonic algorithms! We can choose from the more odd harmonic adding ones, like Analog, Retro, and Tape, or the more even harmonic ones, like Warm, Tube, Triode, and Dual Triode. Each of the algorithms offers its own distinct flavor, and the ability to not only add drive but also blend each of the four bands together creates the potential for targeted enhancement with immense flexibility in tone. It helps to start by letting Ozone analyze the audio to select the natural crossover points, then to crank the drive of your particular band and audition the different algorithms. Once you’ve selected the one you want, you can then back off the drive to get the tone you’re after, and finally adjust the mix to get the amount of that tone. It’s very intuitive and easy to get a good sound, if a little more on the complex side than Neutron. Using an exciter in mastering can help bring out additional clarity and detail without messing with the EQ curve, as well as provide some gentle compression that lacks the tone of using a compressor. While I use it more from a tone perspective than a compression one, I do try and set the exciter before messing with compression for this reason. Oh, and it sounds lovely.
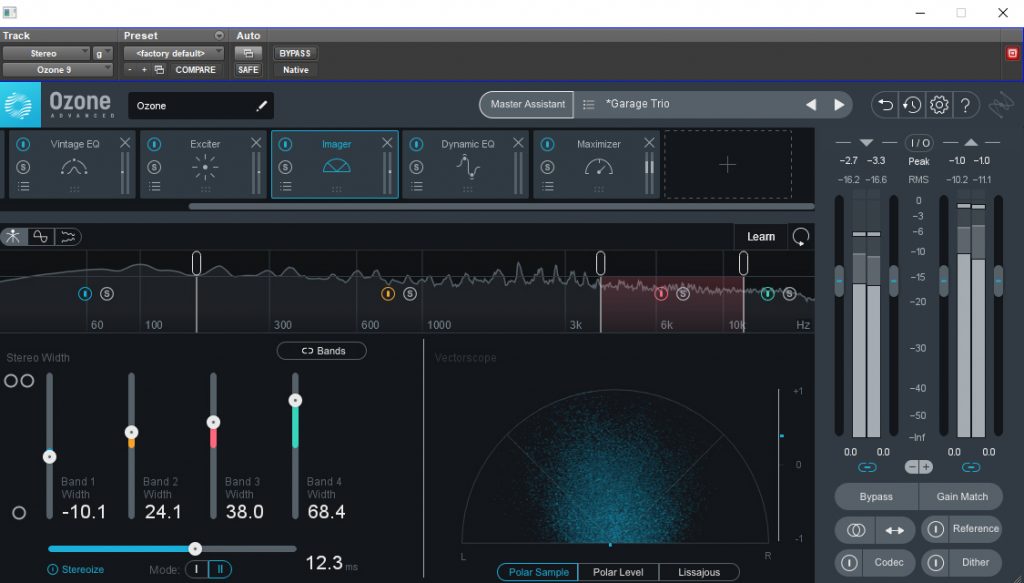
Imager is a multibanded stereo image adjusting darling. You can pick up the single banded version for free, and I highly suggest you do so. I’ve been using the free one on my mixes ever since I got it. It’s very useful for adding extra width to instrument busses (like guitars), though has limited applicability on your stereo bus. Since it’s applied to the entire spectrum, you run the risk of messing up your perfectly aligned low end, and that’s no fun. The Ozone version helps us deal with that by being multibanded, so we can get all that high and upper mid widening that we want, and even narrow up our low end! You can also “stereoize” your master using two different modes, which adds a delay between the left and right signals. I don’t personally find this useful on my main bus, as again, screws with your low end, but it’s also very useful (and way better sounding than a simple delay) on individual instrument busses. Of note with imager is the three different stereo image analyzers so you can get a visual representation of what’s going on, and more importantly if there are any issues with any particular band, as well as an overall phase correlation meter. useful for fine tuning your stereo image, or for watching the music dance.
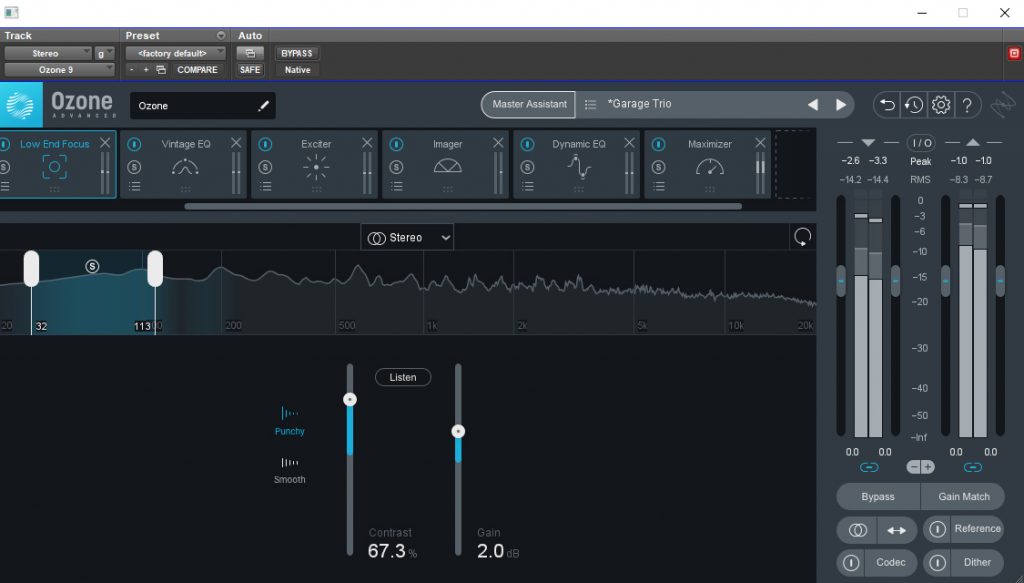
Low End Focus is a recent addition to Ozone that can help deal with issues in the, you guessed it, low end. The controls are relatively simple, you choose whether or not you want to add more or less contrast between the transients and sustain of the signal, and then choose whether or not you want to do so in a more aggressive or more transparent way. The gain then lets you adjust the overall level of the range you are affecting. I’ve found it’s very good for adding punch to a kick drum without affecting the tonal balance, which is nice. Moving up the range, I can also remove some of the sustain to tighten up a bass guitar and add body to the snare. I’m getting better, or at least more noticeable results, from adding punch rather than smoothing things out, but I’m also using my mix, so I already like where things are. My big criticism of this is that it’s not multibanded! I want to adjust both the lows and the low mids, which the plugin can do covering that range, just not both separately. Technically I could load up two instances, but that’s not going to work if I’m using it within the metaplugin. Still, an excellent and unique plugin that’s easy to get a good sound out of from the start.
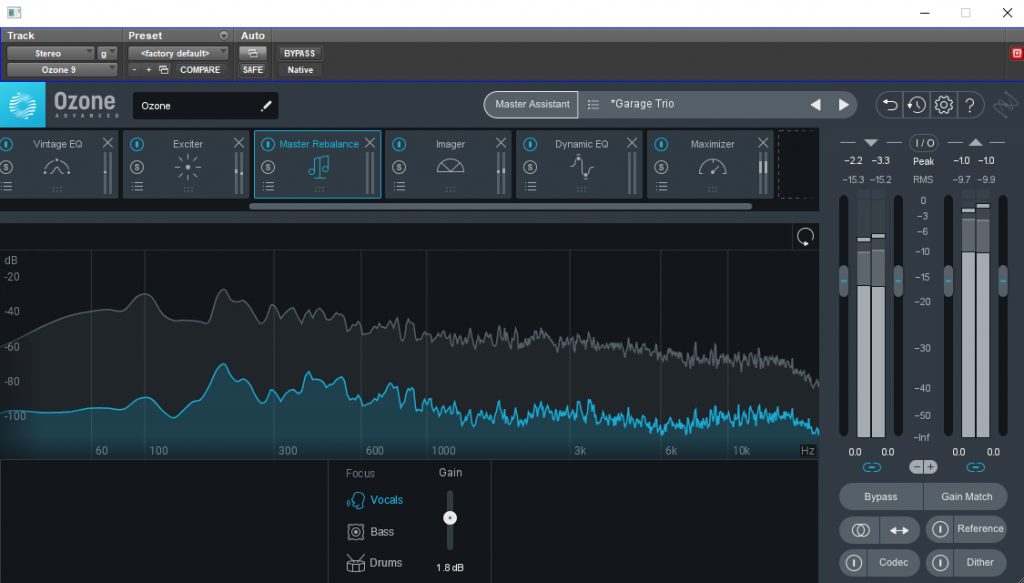
I don’t know if you’ve been in a situation where you’re playing around with a master and just can’t get the vocals to stand out the way you want them to. Maybe the mix is fine, but key elements are a bit too blended, a bit too hidden, and no amount of anything can affect that. I’ve sent mixes back with this change in mind, and the mix engineer has been happy to oblige (using a different mastering engineer is all about having that different and fresh perspective), but that takes time, and what if the mix engineer either won’t or can’t make those adjustments? Master Rebalance allows you to make adjustments to three key instruments to correct this, and I will say it works rather well. All I have to do is select vocals and push up the slider and then the vocals, and nothing else, rise in level, as if I were pushing a fader. The big criticism is that you’re limited in the number of instruments you can choose from, and can only choose one. What if I want to adjust the level of the horns? What if both the bass and vocals need to go up? The manual says this is specifically meant with vocals in mind, and I can see that as being the case. Vocals are invariably the focus of the song, so making sure they’re audible (within the confines of the creative direction of the recording) is important.

Match EQ is a plugin used to, um, match the eq filter of a specific band based on a reference track. Can’t get things to sit right? Or, worse, have a song in a record that just stands out as being different in the mix from everybody else? I had that happen in a record I recently mastered. I ended up having to do a whole bunch of eq to get it to work, and even then it wasn’t quite exact, since I was using my ears and limited number of bands (ie, 1-2) to try and get things sounding the way I wanted them to. By contrast, Match EQ uses up to 8,000 bands to get as accurate a recreation of the frequency content of that particular area, or across the whole track, and then allows you to apply it to the same band in your affected track. You’re able to adjust things more with your fine tune section to get things sounding as close as possible to each other, in an automatic and surgical fashion that produces much nicer, and faster, results than trying to adjust the EQ by yourself. Oh, and your EQ capture can be saved to your presets to load across songs.
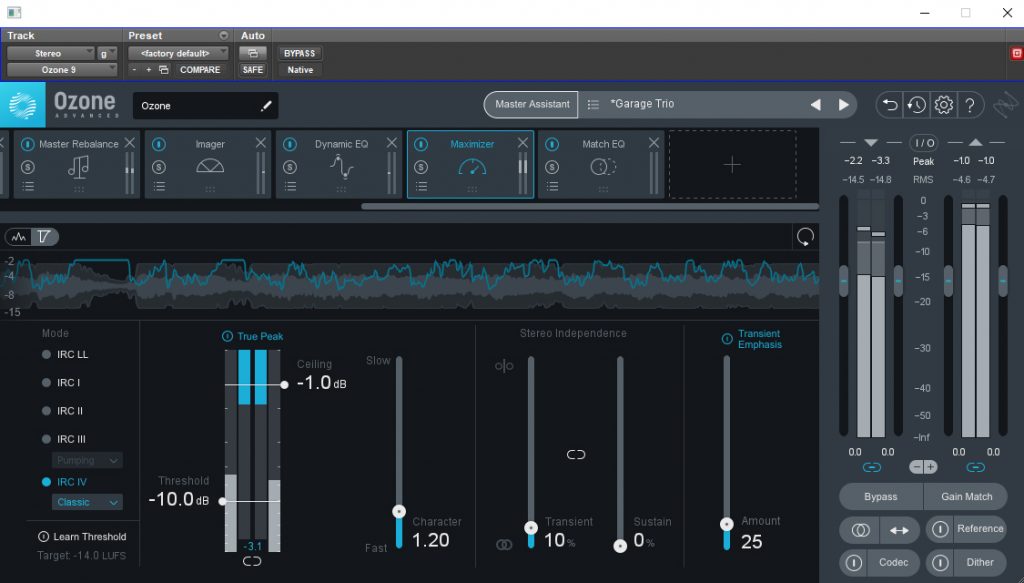
No mastering suite is complete without a maximizer. The end result of a mastered recording, at least these days (for now…), is one that is louder and more in your face, so making sure I can push this plugin as much as needed is what’s ultimately going to give me a competitive master. Sometimes, all you need is maximizer. Now, for this example I’m pushing things hard. You can see this with the squiggly blue line that represents gain reduction. And the output RMS of -4.7. That’s, um, not a lot of dynamic range. Still, despite this I’m not hearing any of the distortion artifacts that you’d get from typical limiting at this level. Maximizer is transparent as transparent can be, on top of giving you all sorts of different intelligent release controls to help give you that transparency and character to the limiting. You’re able to control the overall speed of the attack and release character, adjust the stereo independence of both the transients and the sustain (good if your toms are getting a little squished), as well as give the transients extra emphasis, which is wonderful because this severe limiting will squish those transients down to the point where they lose all their impact. The other really big feature of Maximizer is the Learn Threshold button. This enables you to set a target LUFS value and the program will adjust the threshold so that you hit it. While the program says you should not rely on it for maintaining accurate loudness, it’s still a wonderful tool for getting a starting point, especially if you’re doing different masters for streaming.
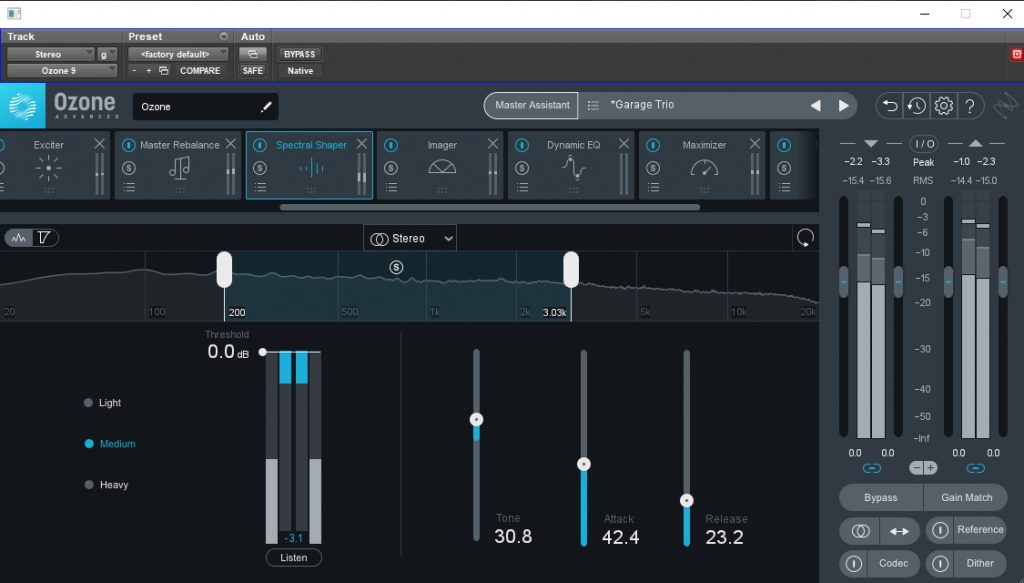
Spectral shaper is used to adjust problematic frequencies and shift the overall tone of your frequency range (hence the “Tone” control). It’s acts like a compressor, with slightly less detailed controls (character selection and the aforementioned Tone control). Across the whole mix, tone ranges from tinny old time radio to muddy outside the club, so there are a lot of options to play around with. The Light, Medium, and Heavy selectors determine the strength of the processing that’s applied. I’m gonna try it on the low mids, since those are always fun to deal with. Even with the threshold at 0dB, there’s still a good amount of gain reduction. Does that mean I have too much low mid content? On light it doesn’t sound too significant, just a bit tighter. Boosting Tone and Attack a tad gives more clarity for the bass in particular. Using it on the upper mids can give us a bit more crunch out of the guitars, which is fun. We can also dull them down a bit, if things get a little too harsh.
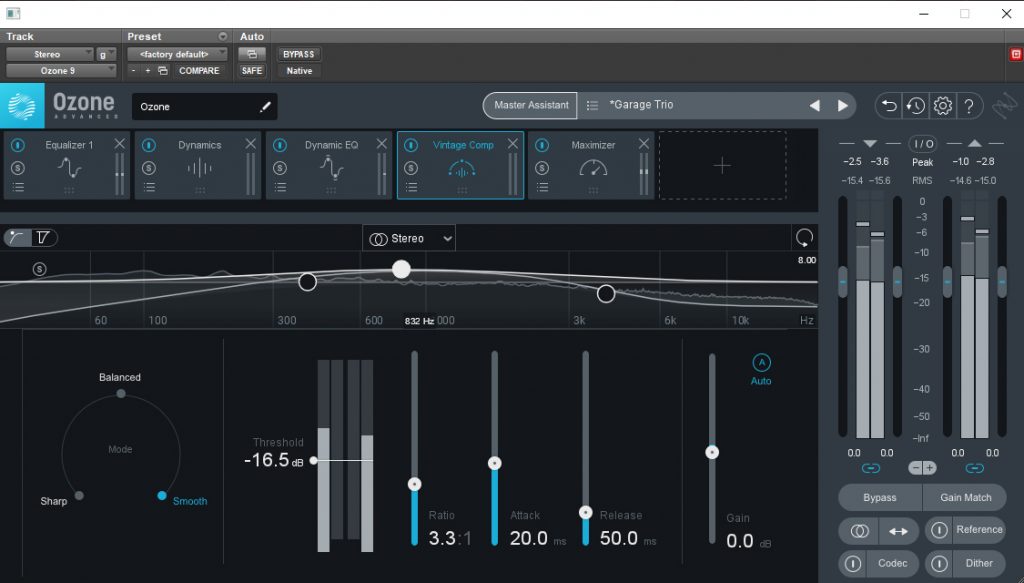
Vintage Comp, as the name implies, is based on a handful of different, classic compressors that have been used in mastering for decades. If you’re after a more vibey, analog tone, this is the compressor you’d reach for. It’s feedback, operating like older compressors, which will give you a slower response time. It has three character modes: Sharp, Balanced, and Smooth. Sharp provides greater transient emphasis, Smooth evens out your transients, and Balanced gives you something in between. In addition to the expected compressor controls, you can apply an EQ filter to the detection circuit, to adjust which frequencies trigger the compressor. Useful if you want to avoid low end pumping, or want to focus your compression triggering on the snare hits. In tone this compressor is rather transparent. I’m not hearing anything that would betray any analog modeling. The “Analog” seems to refer to the functionality, though functionality can affect sound as well. I honestly think I prefer the regular compressor to this, but I can still see it finding its use. Maybe if it did have more of an analog tone I would like it better. Not that that matters. I can just pair things with the Exciter and be good.
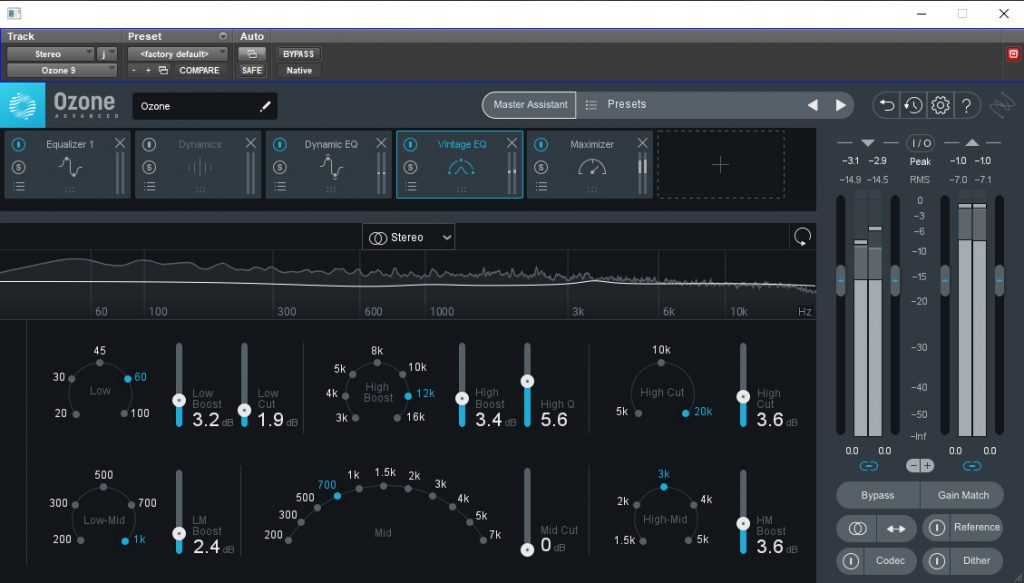
The Vintage EQ is, if you couldn’t guess, designed to emulate the unique, gentle curves of the classic Pultec EQs, specifically the EQP-1A and MEQ-5 models. What this gives you is the ability to make broad stroke adjustments in a musical and aurally pleasing way. We don’t get any added harmonics, which is a bit disappointing, because the Pultec is known for adding richness to the signal without even touching the EQ, but like with the Vintage Compressor that’s ok. We’re not after yet another Pultec clone, and I like the idea of having Pultec style EQ while having the ability to control the harmonics as a separate process. Especially with mastering, where the harmonic content may already sound good, but I want that gentle low end slope and the boost/cut trick. The fun thing about this plugin is that you can actually see the curve you’re creating. I didn’t realize that the 60Hz cut affected things all the way up in the mids. Yes, I’ve looked at a graph of it before, but seeing it in action, as well as hearing it, made it click. The narrowness of that high-mid band is also eye opening. It’s one thing to work with a plugin based on your ears, but having that visual confirmation can be key to really understanding what you’re doing and how to make it work better with the rest of your mix. Interestingly with this unit, the boost amounts seem to affect things way more than, say, Avid’s Pultec. Meaning you have the option of getting more extreme with things, which adds to its utility in a mixing context. It’s also important to note that the boost/cut technique is also available in the regular EQ as the Vintage Filter for the low end boost.

The Vintage Limiter, like the Vintage EQ, seeks to emulate the functional character of a classic piece of equipment, in this case the Fairchild 670 limiter. The Fairchild is one of the most sought after and expensive compressors, known for their unique attack and release controls as well as their unique and pleasing sound. I’ll admit, I haven’t really figured out a use for Fairchild plugins in my workflow. I’ve used them, and they sound cool, but I feel like I’m missing the big secret for how to make them shine. The Vintage Limiter, however, seems to take a lot of that confusion away and give me something that, while the controls certainly don’t mirror that of the Fairchild, are simple to use and produce an excellent sound. Like Maximizer, you are able to set your ceiling and threshold. The Character control adjust the attack and release of the signal, and what those values are depends on which Mode is selected. Instead of having the set values of the original unit, this allows for a contiguous control which allows you to fine tune your values to the song. The Mode parameter allows you to choose between three different settings that affect the attack and release times, as controlled by your Character setting. Analog gives you a fast attack time with variable release, Tube provides subtle nonlinearities, and Modern blends the vintage design with Modern IRC limiting. Sonically, Analog and Modern are actually quite similar. Tube adds an additional brightness to the signal. Modern gives you a louder output with its added, um, modern transparency. Will I use this over Maximizer? I don’t know. The Vintage Master Assistant setting uses both, with the Vintage Limiter used for color, so blending the two seems like it’ll produce the best results for vibeier masters. I don’t know if I’d use this in the mixing stage, but it still sounds good.
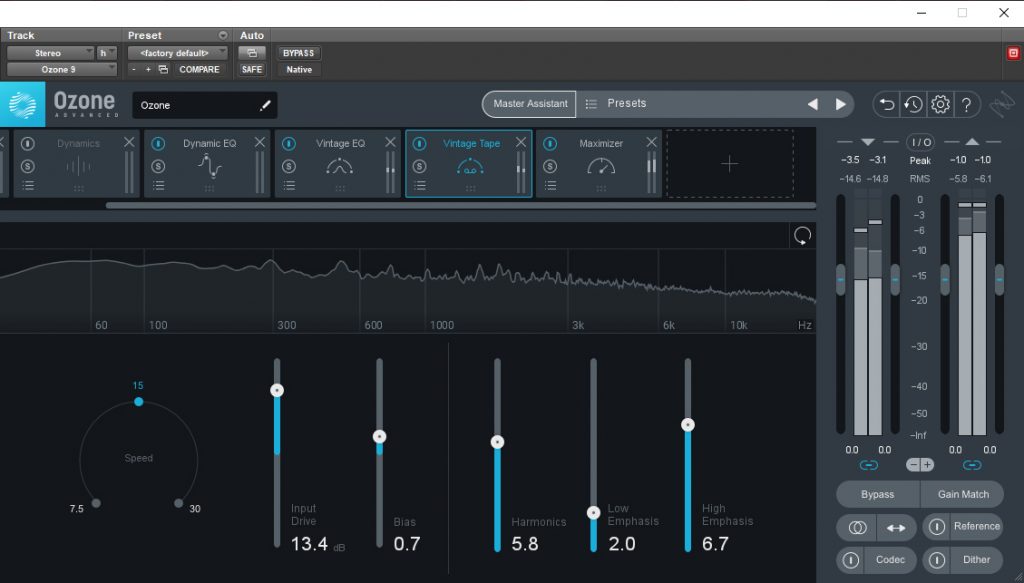
Second to Exciter, the Vintage Tape is a plugin meant for adding harmonics to your signal, specifically those associated with tape machines. The plugin is based off the Studer A810, and allows you to impart in the signal the sound of printing to a mastering quality two track tape. The plugin gives you three speed options, to emulate the sonic qualities of recording at different speeds. Each provides a unique character that can be used to enhance your sound, without worrying about how much tape you can afford. Input drive increases or lowers the amount of saturation that the plugin imparts. It sounds relatively gain neutral, until you really start pushing things, which is nice if you’re after more subtle saturation. Bias allows further customization of the harmonic content, either giving you more high end information, or providing high end attenuation, allowing for a reduced dynamic range. The Harmonics control adds even harmonic distortion to compliment the odd harmonics added by the Input Drive. This gives us a more subtle and musical distortion. Low Emphasis and High Emphasis add frequency bumps in their respective ranges. Low Emphasis gives you a 50Hz bump at 30ips, while High Emphasis can be used to compensate for high frequency loss due to differing tape speeds or Bias controls. Finding the right sound with Vintage Tape is going to come down to experimenting with all the parameters in order to find something that matches the original mix while enhancing it. More so than other plugins within Ozone, this one right out of the gate affects the sound significantly, so its effects should be used sparingly, unless you really want to take things in a new creative direction.
And that’s everything when it comes to the plugins. As you can see, there is a lot of creative and technical potential to be found in Ozone. It’s possible to produce an excellent sounding master using just the plugins within, and if you have Advanced and are able to use the plugins individually, you have the flexibility to mix and match your plugins to create a truly unique mastering workflow, which, since I bought Advanced, is exactly what I’m going to do. Start with Mastering Assistant (if only to get the Dynamic EQ -> Maximizer), then choose the other processes that I want to use out of my plugin library and fill out my insert points. I’m probably not going to want to use every plugin on every master. I try to keep things simple as is. Having things like Low End Focus and Master Rebalancer is going to be extremely useful, but also not something that I’ll use on everything, like EQ or compressors or Maximizer.
As I said above, the metaplugin also contains a lot of handy features that’ll allow you additional control and utility as you finish your masters. You have the expected sum to mono and stereo image swap, which are nice, as well as the ability to gain match to your mix, so you can bypass and do a proper comparison between the original mix and what it is you’re doing with your master. You’re able to load up a reference master and quickly A/B between your master and it, in order to hear how close you are to what you’re after. It even is able to detect section changes in your reference, so you’re able to jump between verse and chorus and bridge to find the exact part of the reference you want. You’re able to audition lossy codecs like MP3s at different bitrates to make sure that your master translates to what is the more common way to listen to music (I sincerely hope that, as services move towards lossless streaming, this feature will become increasingly unnecessary, if only for my own personal listening experience). You also have a high quality dither with all sorts of options that allow you to customize the dithering curve to your source, as well as adjust to a variety of bit-rates, and it gives you a handy visual representation of what the dither is doing, so you can have at least a better understanding of what’s going on, on top of the additional control compared to other dither plugins. All of these are excellent features and will keep me using the metaplugin, regardless of how many non-Ozone plugins I use in my mastering chain.
Finally, we get to Tonal Balance Control. When I wrote my Neutron review, I’d only just noticed that it came with the package, so I hadn’t had much experience using it in the real world. Since then, I’ve been able to use it on a few mixes and masters, and I have to say I have thoughts.
First the good thoughts: The ability to select your reference mixes is huge. Not only does it allow you to see which frequencies are in line with the balance of your reference, but you’re also able to select entire folders in order to get an averaged reference curve. This is cool, if you have a good variety of reference tracks, but way better if you’re trying to find an overall curve for mixing/mastering a record. For a master, I’d done a pretty good job just doing it all by ear, but using Tonal Balance Control as a final pass to make sure helped me do a little extra polish that really took my master to the next level. Depending on the genre, significant enough tonal shifts between songs can take the listener out of the experience, so making sure to get things as close as possible is one of the key jobs of a mastering engineer. While I don’t think this will replace my ears, as far as the initial balance, it is going to become a key final pass in both my mastering and my mixing to ensure that I maintain that consistency.
Now the bad: The built in preset curves leave one wanting. I was working on a folk song, and the folk setting HATED the sound of a solo acoustic guitar, despite the guitar sounding, well, like an acoustic guitar (and exactly what I wanted it to sound like). When the whole mix is being played it evens out a bit more, but it does seem a little too ridged, and isn’t useful during sparser parts of the mix. There’s also an obnoxious lack of curves, especially since the plugin can create curves based on your individual references. I’d imagine it wouldn’t be too complicated to average out different curves from more genres to help give people more nuanced starting points. If I’m working on an indie rock song, with cleaner, more upper mid focused guitars, it’s not going to sound good if I boost the lower mids to fit what the plugin things a “rock” song should sound like. It’s definitely hit or miss, and you need to be aiming for average if you want to use the built in curves. Which, overall, you shouldn’t. Load up (lossless) reference tracks and create something that works for your song. You’ll get better results out of your work, while still being able to use the good aspects of the plugin, because conceptually and in execution it’s very cool and very useful. If my big criticism is that the presets leave me lacking, and I have a workaround that’s probably better anyway, well, get Advanced and use this.
So, should you buy? Yes. Splurge and get the Advanced version to get all the plugins and features and flexibility. I can very easily see Ozone overtaking my other plugins as my go to for mastering, even though I don’t intend on starting off with it doing so. The quality of the plugins is amazing, and even the most complex of them are easy to use, plus there are a few that affect things in ways that go beyond your simple EQ and compression, which is cool. I mean, being able to raise the level of the vocals without affecting the guitars? That’s huge.
If you choose to buy, please use our affiliate link to support the site!
Ozone 9 Elements
Ozone 9 Standard
Ozone 9 Advanced

Lilian Blair is a producer, engineer, and audio educator in the Seattle area. She specializes in studio recording, mixing, and helping artist achieve their musical dreams.
www.lilianblair.com