

Ok, another big one. The Anthology XI bundle from Eventide contains a staggering (please no) 23 plugins that seek to capture the best of what Eventide has to offer. First, what this is not: It is not a complete plugin collection. Would that that were the case, especially with the considerably high price tag this bundle already sports. While there is some overlap with the other releases; some plugins here are available in the H9 bundle, and there’s a stripped down version of the SP2016 reverb; what you’re getting is a giant collection of effects processors, not simply delays and reverbs, but also EQs and compressors and other goodies to expand your creative repertoire. Because of the size of the bundle, I’m splitting it off into parts, and if I reviewed anything previously, that review is getting copied over. Why? Because that’s how I want to do it. As with the other Eventide plugins, we got this one directly from the company. Given the price tag, I doubt I would have bought it myself. I mean, it’s almost as expensive as a Creme! Which is likely my “Sometime this year but not quite yet” big purchase. Anyway, let’s get to it, starting with….
Yes, it’s a repeat of the H9 bundle! In the interim I ended up using it on a project and yes, like most of these plugins, while their use is niche, when you do find yourself in that niche, it performs amazingly. Anyway, here’s my old review:
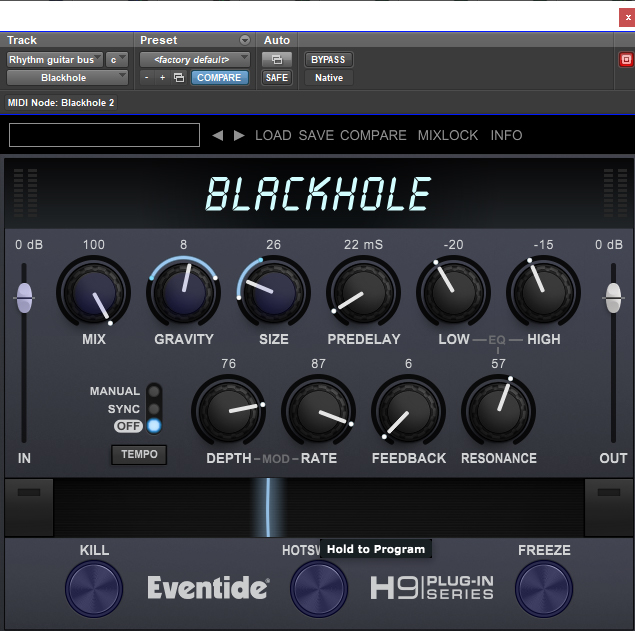
Blackhole is insane. I don’t even know how to describe what it is supposed to be. To call it a very big reverb is missing the point entirely. Sure, it technically is a very big reverb, but the potential for sound goes far beyond the expected “paaaaaaaaaaaaaaaaaaaaaaaaaaaaaaaaaaaaaaaaaaaaaaaa.” Just adjusting two parameters: “gravity” and “size”, with mix set to 100%, I can get a kick drum to sound like anything from Blade Runner to a pewey electronic hit with just the reverb. No dry signal. The Gravity knob is the equivalent of the reverb’s decay, though with a twist. Positive numbers (to the right) are your typical reverb decay fun, while negative numbers (to the left) are closer to a reverse reverb. No more having to print, cut, and reverse to get that fun 80s snare effect. Size is a bit more self-explanatory. It is the dimensions of the space, which Eventide says ranges from “cartoonishly small to cosmically epic.” I guess that’s where my “pew” kick is coming from. Can I get a cool, usable reverb for a mix out of this? Sure. Some tweaking and I’ve got something that doesn’t sound real, but also doesn’t sound bad. Other controls are modulation speed and depth controls, high and low eqs, an additional resonant adjustment for those eqs, and feedback. Feedback works like other feedback controls, sending the reverb signal back into the plugin’s input, but with a cool feature called “Freeze” at the very extreme. Freeze shuts out all incoming signal from the reverb, letting the audio continue to play unprocessed while the reverb trails off. Way easier to automate, not to mention cleaner, than mute automating your reverb sends.
The final control of note is the Ribbon function, which is a squiggly line at the bottom of the plugin. This allows you to control different parameters at once, within a set range. If you want Gravity to increase and Size to decrease at the same time, set your ranges and automate your Ribbon. This not only clears up time, since you only have to automate one thing, but also gives you lots of creative potential, since you get to hear how things change simultaneously, instead of building each parameter on top of each other. Ribbon is a feature found in all the plugins, and is key in unlocking the creative potential of the plugins. See the blue lines on the parameters? That’s the ribbon range, and I can set the ribbon to control every parameter with a semi-easy drag of the little white and blue dots. It’s a very powerful feature and key to unlocking the full creative potential of the plugins.
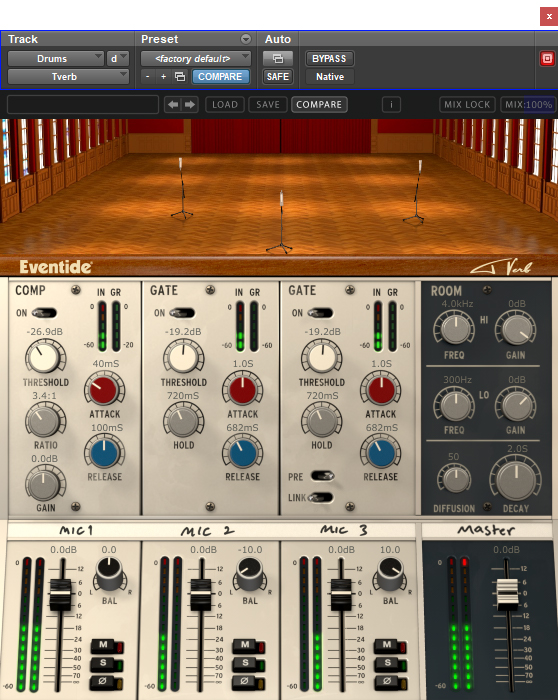
Tverb is a very cool concept. It is inspired by a recording technique used by Toni Visconti for recording David Bowie’s “Heroes” vocals. You have a giant hall reverb with three microphones. The second and third microphone have gates on them, so if you set things right, the dynamics of your source can trigger one, two, or all three microphones, giving you more or less reverb to allow things to be close and intimate or large and bombastic. This is a cool idea, and one that I haven’t actually played around with. It might not have even been come up with at all, were it not for the fact that, when recording, they were down to their last track on the tape, so lacked the space to have all three mics available during mix down. Hooray for the limitations of the past! It gave us a cool sound and an interesting technique to get it, and, ultimately, a fun plugin for all of us to play around with.
The controls are relatively simple. You have a compressor on mic one, and gates on mics two and three. Each of the mics can then be blended and panned to get your final reverb balance. There’s also a couple specifically chosen EQ points, and your expected diffusion and decay controls. What’s really cool, though, is that all three of the microphones are draggable, creating a giant variety of different sonic possibilities and elevating the plugin beyond a recreation of an interesting technique to a truly useful and beautiful sounding reverb. As you can see in the above example, I just kind of moved things around, not really caring where they landed, and how does it sound? Good. So I dragged them around some more, and it still sounded good. Different, but good. Because the modeled room sounds good. I love getting natural reverb sound. In fact, the first thing I look at when I consider working out of a studio isn’t the monitors or the board or the compressors or even the mics, it’s the room. Gimme (enough) cheap mics and a good room and I can make something that sounds amazing. Especially drums. This plugin accomplishes that, with the creative flexibility to mic the fake room like I would a real one. I like this setup so much that I want more rooms. Why, Eventide, limit us to this one, particular, beautiful sounding room? Gimme more! Waves’ Abbey Road Chambers plugin does something similar, but we’re limited to three different mic positions, though have three rooms to compensate (I’d review it if I weren’t locked out of my plugins because I had to reformat. Thanks Waves). I want big rooms and small rooms and stone rooms and wooden rooms and bathrooms and stairwells and a gazillion places to play around with. At least this plugin sounds amazing enough that my one criticism is that I want more of it. This has the possibility of becoming my go to room reverb, even supplanting the SP2016. Speaking of…
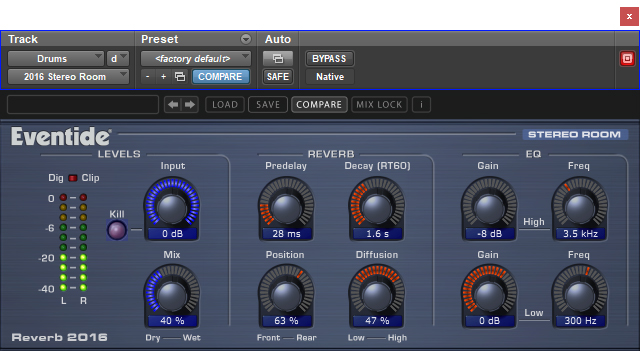
The SP2016 Stereo Room (gotta get the names right) is a stripped down version of the SP2016 Reverb that I love so much. While the controls remain the same, this one only has a single algorithm, making it a bit more limited in the sound that is possible. Still, the algorithm they chose is my favorite. I like recreations of physical spaces almost as much as I like physical spaces (if you couldn’t have guessed from the above review), and while the Stereo Room isn’t necessarily a recreation of a real space, it contains everything that I want in a reverb to make it useful. Now, this is not a plugin that I’m actually going to use; I have the SP2016 Reverb, but if you don’t have that one, but still want the sound of it, then this is the plugin for you.
The big difference between this plugin and other reverbs is the position knob. This changes the character of the reverb to create the sense of distance from the sound source. Sonically, this introduces a delay, as well as additional reflections and a darkening of the sound to create the sense of depth. While the front position is really tight and hides the scale of the space we’re ostensibly working in, the rear position is positively cavernous. I’d love to see a studio that can recreate the versatility of this plugin. But, it’s limitation is why I also don’t really like it. Because the actual SP2016 Reverb is so good that you really ought to pick it up, if you’re looking for an excellent, premium reverb.
Next up another copy/paste! I think I’m going to enjoy doing this review.
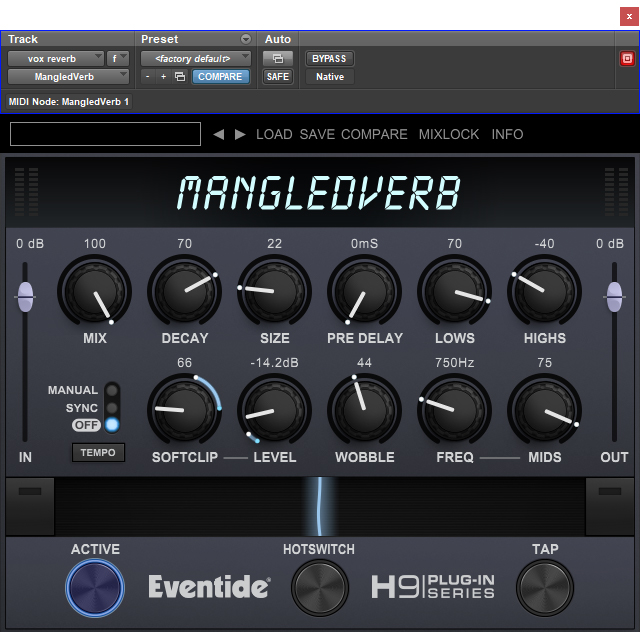
MangledVerb is a reverb with a distortion phase added to the signal to create all sorts of gritty, glitchy, messed up tones that range from an abandoned factory to a dog bark. The combination of distortion, modulation (wobble) and the uniqueness of the size knob makes this a cool effect that’s also suitable on a wide range of sources. For my messing around with rock song, I’m finding it sounds excellent on drums (room mic), guitars (lead), and vocals. It’s definitely effect heavy and not going to be my go to reverb, but the fact that it sounds so cool on so many things makes me think it’s going to stay close at hand. Let’s go over how it works. Decay controls the length of the reverb tail, though a shorter decay can give you the effect of a reverse reverb, which is an interesting effect to play around with. It sounds like pumping caused by side chaining the vocals to compress the reverb (which, itself, is a cool thing to try if you need a strong reverb but it’s covering up your dry signal). The result is more like an echo than a traditional reverb. Longer decays are more traditional in their decay, so there’s that versatility. Size controls, again, the size. The manual doesn’t go into any more specifics. What it sounds like is both the apparent size of the simulated space but also the position of the mics, and that’s something that I don’t like. I’m finding with these reverbs that a lot of what I choose isn’t due to the sound but rather the delay. I need everything to fit musically, and I can’t if there’s too big a delay or build up until I get my reverb sound, even if I like the overall sound that it gives me. So, separate knob for mic position please?
With that in mind, I start with size and then set decay. I’ll set a predelay if I need a little space for my dry signal, but I’ll then go and adjust size again to make sure the delay fits. Next up on our signal flow diagram is the EQ section, to sculpt the reverb before it goes to the distortion stage. We have a high, low, and selectable mid eq. Doing some quick adjustments (especially that mid band) really helps make this reverb go from fun to amazing. Making things subtle actually helps accentuate the interestingness of the reverb characteristics and the fun added by the distortion. Next I’ll set the distortion and the level. I prefer more softclipping to overdrive, but that’ll depend on the source. More extreme is good for effects, more subtle is good for overall uses. Finally I’ll set wobble, which is both modulation depth and rate. Then I’ll blend it all in and have something that sounds like a reverb (good), works with my song (good), has a cool and unique quality (good), and has the flexibility to do something really crazy (good). I like this plugin.
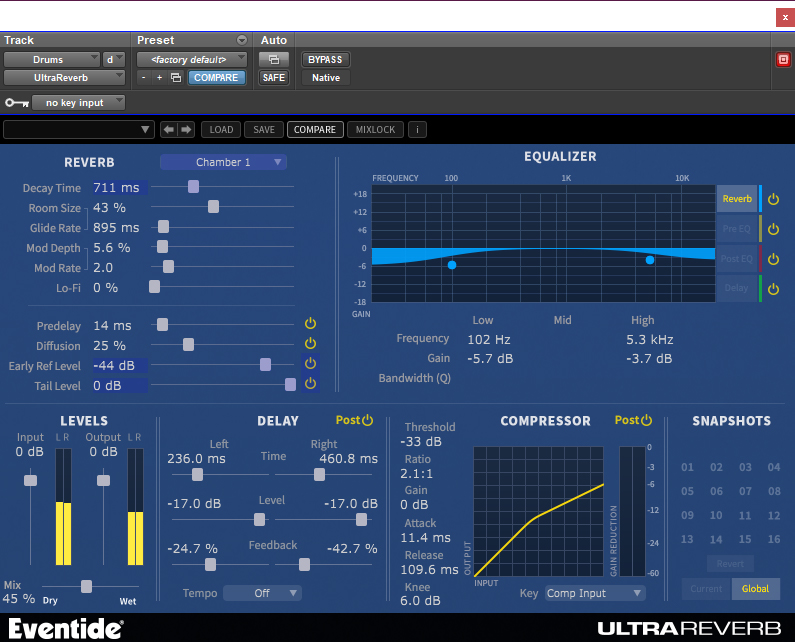
At first glance Ultrareverb looks like a beefed up version of D-Verb (or any other versatile stock reverb). It has a good selection of algorithms and all the expected controls. And then some. I mean, what is “Glide”? And what’s the compressor for anyway? To the manual! As important as being able to decipher something from the first open is, sometimes you’ve gotta do a little research in order to figure out exactly how to get the most out of your gear. At least with Ultrareverb, the layout is, while busy, very straightforward and easy to navigate. I’m not intimidated looking at this for the first time, and was easily able to dial in something that sounds cool (love that delay section). The algorithms themselves are all passable. I don’t like them as much as other Eventide algorithms, but they’ll serve in a pinch. Around D-Verb quality, which means good, but not blow you away good. I can see myself reaching for this if I need a bit more flexibility. Sort of a second grab. Start with SP2016, and if that doesn’t work, go for this.
As far as features go, beyond the standard controls you have the ability to control the early reflection and tail levels of the reverb, giving you additional control over the sound you’re getting. You also have pre or post reverb delay section which allows you to do everything from add subtle width to crazy bouncy goodness, and a compressor (again, pre or post) which allows you to greater tailor the tone of your reverb. The only thing really missing is a gate. I mean, in addition to the combination of a gate and a reverb being a very common and well liked effect, at least when I do it I always have some serious compression involved as well. Ultrareverb gives me most of what I need to get all post-punk, but I still have to add in other plugins, which seems to go against the goal of this plugin. The EQ section is very nuanced, and provides separate EQ curves for the reverb itself, pre, post, and delay. But no gate? Still, the overall control allowing you to shape the sound and creative characteristics of your reverb makes this a contender to be my first grab when it comes to needing something a bit more in depth when it comes to the options available. That said, the algorithms, while good, don’t wow me the way other reverbs do (such as the aforementioned TVerb), so I dunno.
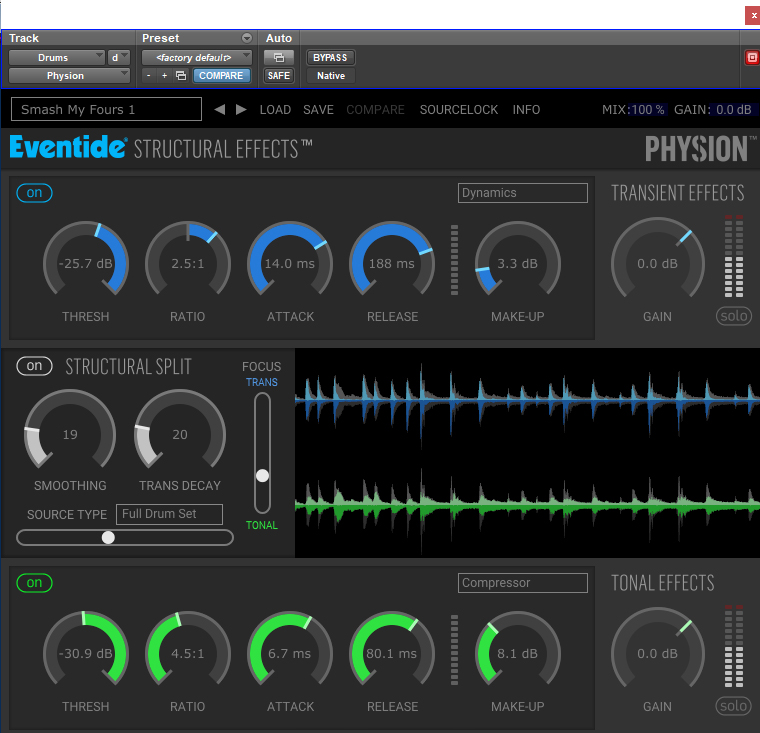
Physion is the type of plugin I could do a whole review on by itself. Maybe I will. Its unique characteristic is that it splits the signal into transient and tonal components and allows you to process them separately. Each of the two signals has a series of processes that are available. The transient section allows you to use Delay, Tap Delay, Dynamics, Phaser, Reverb, and Gate with an EQ. The tonal section has a Delay, Compressor, Pitch, Chorus, Reverb, Tremolo, and EQ. Enough to give you an expansive combination of different processes to use to create an effect that is wholly unique. Combine the a transient reverb with a tonal compressor to have beefy drums that has a touch of extra air, or use a phaser to add width and coolness without making the effect too obvious, as it would be applied to the whole signal. I really, really, really need to play around with this one more. I can easily see it being a game changer (I can’t believe I just used that phrase) when it comes to the creative elements of my mixes, and potentially even the more subtle processes to enhance the source in ways not possible with other plugins. At a minimum it’ll get me thinking of things in a whole different light, and that’s something incredible.
(Another copy/paste from my H9 review)
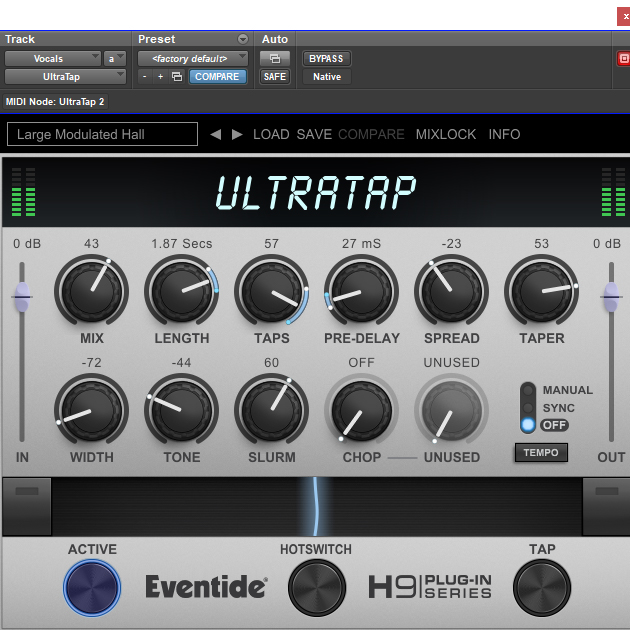
Upon opening Ultratap, I was ready to dismiss it as yet another too extreme creative weirdness effect that has no real utility in my mixes. After all, the default settings are crazy, with seemingly endless, undulating, sputtering delays, wide and intense and insane. How could anyone actually do anything with this. But, before talking about how much I don’t like it, I decided to dive into the presets. The picture above is the Large Modulated Hall preset. I didn’t mess with it at all, instead slapping it on a vocal and you know what? It sounds like a hall reverb, though not like your typical hall reverb. I can’t put my finger on it, other than the fact that it was created differently than a hall reverb plugin, thus giving it its own character. So what about this gives us our hall sound? I think it’s the Slurm, to be honest. That and the Taps. Taps determines the number of, um, taps that are in the signal, up to 64, which is a lot of taps. Slurm adds modulation and detuning and diffusion to reduce the attacks of the taps, giving us a smoother and more smeared sound. Mix the two together and you have a quasi reverb! This is cool! Of course, then we move into the crazier effects and I’m lost again. Length determines the time in which the taps are spaced out. Spread groups the taps together, either putting them closer to the source audio, or farther away. This can give a swelling effect that has a lot of creative potential. Width determines the panning of the taps, alternating from left to right. Taper controls the relative volume of the taps. Negative values have the volume increase towards the latter taps, with positive values having the volume fall off (like a regular delay). Chop is a tremolo applied before the tap section, with all sorts of LFO settings to play around with. My overall impression of this plugin is that it’s one of the more complex ones in the bunch, which is both good and bad. Good, in that it offers a lot of versatility and creative potential. Bad, in that I’m still having a hard time figuring out the best way to use it. Still, the potential is insane, and we like insane.
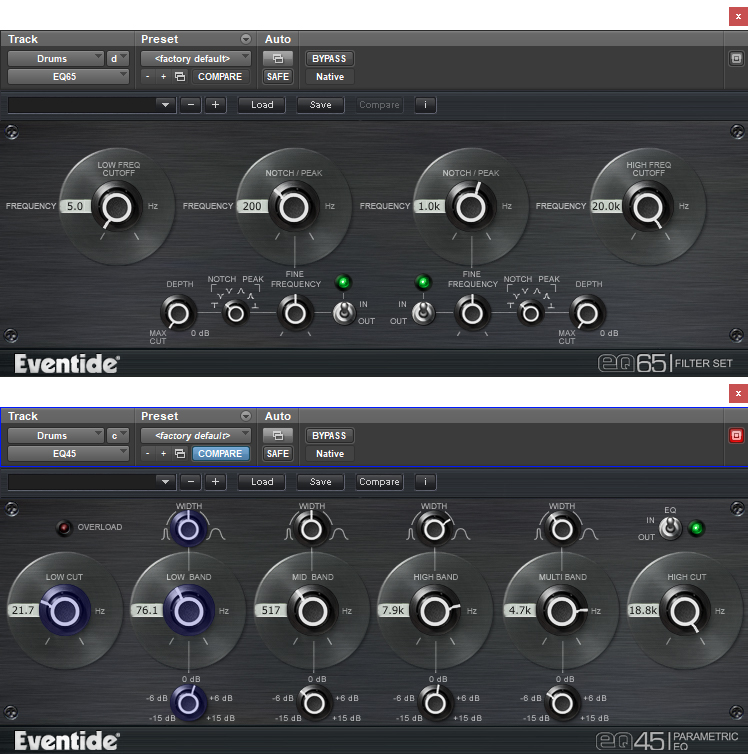
I’m combining these two because the manual combines them. I don’t really have a lot to say about these. They’re good, easy to use EQs. The manual doesn’t give us any indication as to whether or not they’re modeled after anything in particular, though judging from the interface they do tend to convey some sense of analogness. Sonically they’re very transparent, though maybe a bit smoother and less clinical than what you’d expect from you standard digital EQ. Not to say they have color, just that they might have more going on than the copy would make you believe. The controls are simple and very easy to dial in. Using the EQ45 I was able to enhance my not fun sounding drums (I don’t like Glyn Johns’ famous drum technique, and yet I’m stuck with it for this project) in no time, though it’s not fancy enough to help me tame that obnoxious ride cymbal (damn you Glyn Johns!). Despite the EQ45 being a good EQ, there’s nothing noteworthy about it, so I can’t say it’ll end up being a first grab. Or second. Or ever. I have too many EQs already.
The EQ65 provides two notch/band filters that give you fine tune control over removing problematic frequencies. Particularly useful for high pitched whines or hums from electrical equipment, or pesky ride cymbals that are just way too present because there’s a damn microphone right next to them! I like that there’s a depth control, giving us more versatility than Pro Tools’ stock notch filter, but then how is it any different from whatever I can do with one of my digital EQs? These sound fine, to be sure, but there’s nothing jumping out at me as being my new go to for any reason.
Hmm, I wonder what this is supposed to be….
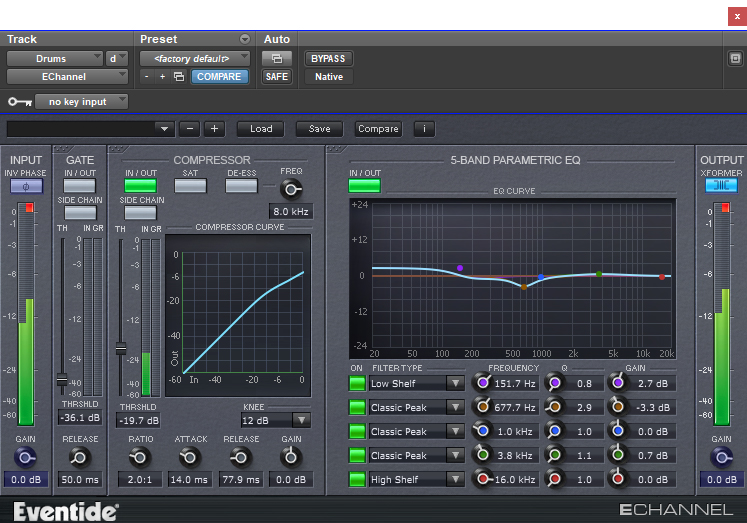
The EChannel is a channel strip that may or may not take after one of the most ubiquitous and modeled channel strips out there. I can’t say for sure, because I know what it looks like, I know what processes are available, and I know what the transformer makes it sound like, but the manual itself doesn’t give us any indication as to whether or not it is what I’m assuming everyone will think it is. So I won’t say it out loud. Despite appearances, it’s not a ridged recreation of That Thing, in that it has a few additional toys to play around with that I haven’t found in other recreations of the channel strip that this may or may not be trying to sound or at least function like.
The plugin has a gate and a compressor, both are side-chainable, with all the controls you’d expect, including a very generous knee on the compressor, and a de-esser as well. The EQ is five banded with variable frequency, gain, and bandwidth (which is appreciated. There are multiple filter types, such as classic and modern peak. The shelf filters can be switched to peak filters, giving us additional flexibility, and having their own bandwidth control can allow us to create fun resonances or gentle slopes. We also have two low and high pass filters for added flexibility. The output stage has an optional transformer modeling circuit, which can be driven to distortion, and adds a nice high end polish to the sound. Without it, the plugin is very transparent. The individual modules can be rearranged, which is cool. I know there’s a degree of flexibility on the actual hardware, but having that as a feature really makes me happy.
Do I like this plugin? Yes. It’s easy to use and sounds good and that’s all you really need. Am I going to use it? I dunno. Maybe. The transformer sound is a lot more colorful than other versions of this particular thing that I’ve tried, so if I’m after that sound, and really want it to sound like that sound, I’ll reach for this, if only to use the transformer. And maybe I’ll use everything else because I have it. Is it better than all the other versions of this? I dunno. There are too many to try. I could write a whole article comparing everything and probably not have an answer to as which I prefer. And, also, I don’t want to do that. Because I’m a Neve girl.
And that is that for part one! Overall I’d say this bundle is off to a good start, but I won’t be able to give a proper recommendation until after I finish everything else, which will be, um, eventually.

Lilian Blair is a producer, engineer, and audio educator in the Seattle area. She specializes in studio recording, mixing, and helping artist achieve their musical dreams.
www.lilianblair.com