
When iZotope announced Neutron a few years ago, I shared the skepticism I saw in audio groups online. I mean, something that promises to automatically balance your mix? Are they trying to take our jobs? So when iZotope offered to give us a license I put aside my better judgement and picked Neutron over the Ozone I actually want and the Rx I actually need (Elements is fine, but I still want the real deal). Yes, I got my license for free. There. Disclosed. I promise to be as cruel about it as I am with every other product I review. Why did I go for Neutron? I was intrigued. I’d used Elements before and was blown away by the features it had, so of course I wanted to try the whole thing. Eventually, once you (timidly raises hand) get over the principal of analog modeling everything, you realize that what matters isn’t how you get your sound but the sound itself. And that getting things faster is always a good thing. So is it worth that $400 price tag? Let’s dive in. (Oh, and they gave me the advanced version, so some features I talk about may not be in the standard or elements versions.)
Neutron, like iZotope’s other flagship products, is less a plugin but rather a suite of them. You get your standards, like an EQ and compressor and an exciter and a transient shaper and whatever The Sculptor is. It lacks time based effects, but whatever. You have those already. This is about making things sound better, and work better together, and making your life easier. How much easier you ask? Well, that depends on which part of the plugin suite you’re using.
Let’s start with the auto leveler/balancer dealie. This is one of Neutron’s major selling features, so it’s got to be easy to use and powerful and indispensable, right? In order to use it, you need to place an instance of the “Relay” plugin (or the Neutron metaplugin) at the start of your signal chain, then select track balance from the Neutron metaplugin, then follow the instructions to choose your focus tracks. The plugin analyzes the audio content to group your tracks together by instrument (drums, bass, vocals, and the rest) as well as your “focus” tracks. These tracks are the ones you want to be the primary, um, focus of your mix. Naturally, I’m choosing the main vocal track and, since I’m working on a hard rock track, the distorted guitar tracks. Once I’ve selected everything, I now need to play through the entire song and allow the program to analyze the music. This is already a problem. This kind of thing needs to be practical in addition to being easy to use. We’re not after perfectly mixed here; this part of a plugin is specifically for mix balance, before things like EQ and compression and all that jazz (hmm, I wonder how it does with jazz…). With any reasonably sized mix, I can get that balance pretty quickly, so having to set it all up, then wait for the song to play, then listen again to make my own adjustments? That’s too much time for not enough results. The snare is too loud, so I gotta go fix that, and I should probably go and do my own balance afterwards anyway. Why add in all these extra steps? All this extra time? I don’t like this feature. For something as key to the plugin, it should be both easy to use and give me good results from the get go. I watched videos, followed the instructions, and still can’t get it to give me what I want.
Next up is their other big innovation: the visual mixer. We’re all used to faders and pan knobs, but those are relics of the analog days. What the visual mixer is trying to do is find a more modern alternative to that antiquated method of balancing a mix. Their direction is to plot a mix on an X/Y graph. The horizontal axis is the panning, the vertical is the volume. Simple, elegant, easy, just drag the elements around until they sound good. Right? I’m working with 18 tracks on this test mix, which is not a lot of tracks, but even with this small number the problems with the visual mixer become evident. There’s just too much going on to be able to get a decent balance! Here’s what I’m looking at, after the track balancer didn’t really do what I wanted it to do:
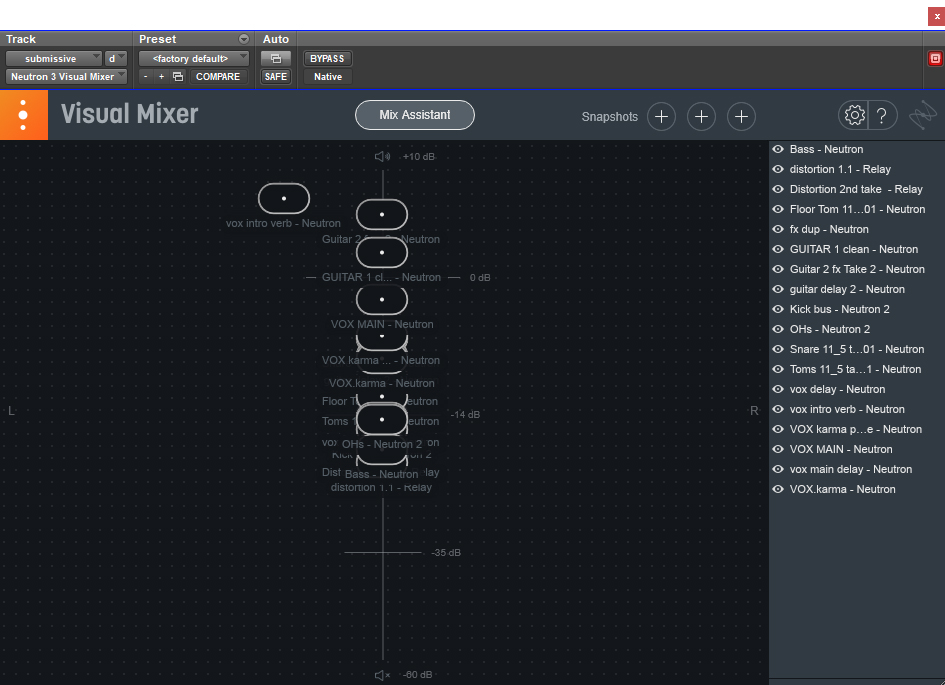
That’s a jumbled mess. Yes, I can select tracks off to the side, but that requires looking through a tiny track list. Yes, I can make tracks visible and not, so I can balance different elements at a time, but again, time and energy for something that’s supposed to be saving both. Oh, and here’s something fun I just discovered while messing around to write this article: if I want to be able to pan things, I have to use the stereo instance of the plugin, converting my tracks to stereo, making things that much more obnoxious to deal with. We’re constantly panning mono tracks in music. Why do I need to convert my guitars to stereo just to drag them off to the sides? Ok, everything’s stereo now, and I’m gonna balance the drums. Since this is a home recorded track, it lacks the not quite excessive number of drum mics that I use when I record. Still, even with five tracks it’s unruly. Anything close in level (like properly balanced tracks) gets obscured, so I’m still jumping over to the track list to select different tracks. I now have to go back and make sure that the stuff I want dead mono do use the mono instance of Relay, because there’s no (obvious) way to actually get these things to snap to mono. This means more setup time to get the right plugins in use. Here’s the balance for the chorus:
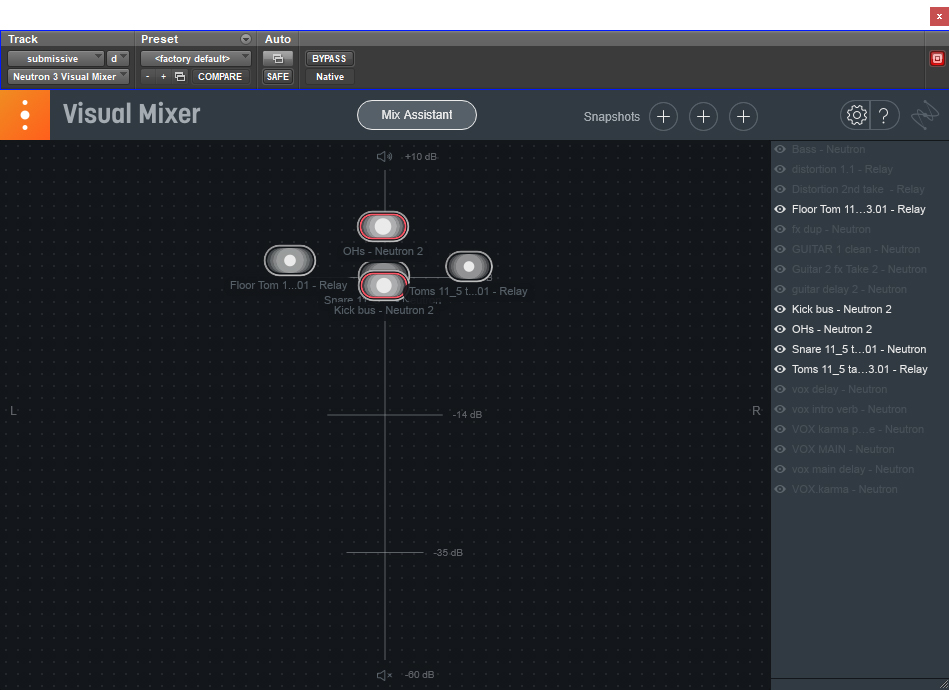
See how I’m not even using all the tracks and it’s already too busy? And it’s not as good or fine tunable as if I was just balancing my mix the old fashioned way. I don’t want to keep struggling with this. I don’t want to have to go turn different tracks on and off to try and get things balanced, constantly selecting the tracks from the list when I’m supposed to be able to just drag them around. It’s not easy and it’s not fun, and while they’re supposed to save you time and effort, they actually end up costing more of both. Bleh. Even only using this on instrument busses, why? If they’re recorded well they’ll have similar levels, and I’ll deal with everything being on the mono axis anyway, since I want my stereo guitar bus to be centered.
So if the two main revolutionary features are obnoxious and definitely not worth the price, what’s actually good about thing thing? I’m glad you asked, rhetorical me! The intelligent analysis thingy working behind the scenes isn’t just for overall track balance. When it comes to the mix assistant, you can select Track Enhance instead, and that’s where the fun really begins. Plugins have come with presets for almost as long as there have been plugins. People who know what they’re doing (ostensibly) saying “Yes, here are some ways you could EQ and compress your snare drum.” They sometimes sound good, sometimes do not, but always serve as starting points for mixing, whether it’s giving you an idea or getting you partway there. But with other plugins, those presets are static. Someone decided that a 2.5kHz boost sounds good on a snare drum, and now your preset starts with a 2.5kHz boost, regardless of the frequency content in your actual signal. Neutron, by contrast, actually analyzes your audio signal to create custom presets based on the content of the signal, creating something tailored to your needs, giving you a whole signal chain that not only gives you a good starting point, but often, I’m finding, gives me exactly what I wanted, and exactly what I didn’t know I wanted too.
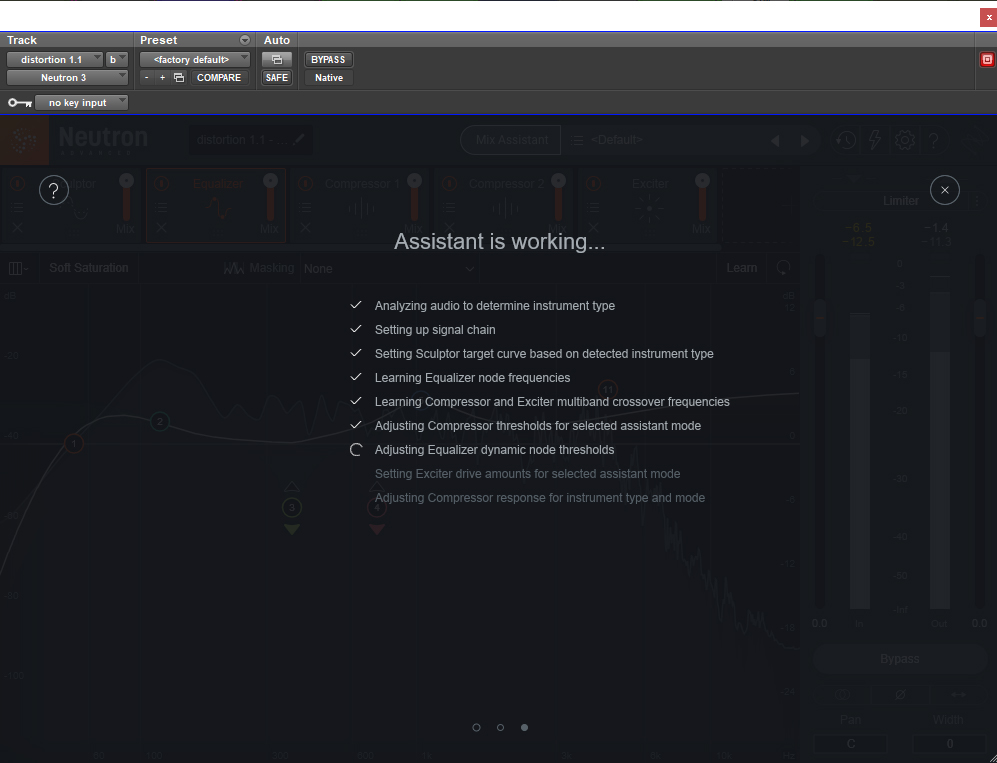
So how does it work? You first open your plugin, click on Mix Assistant, then select Track Enhance. It takes you to this screen:
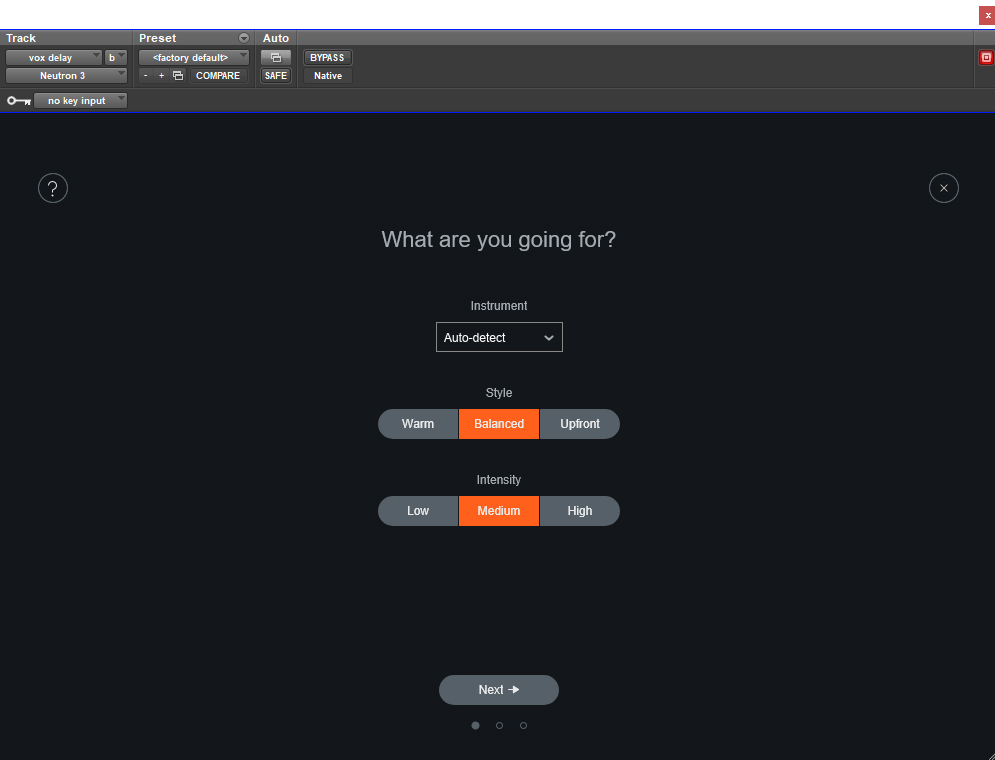
You get to select your instrument, or have Neutron figure it out for you, and then choose the overall character of the sound you’re after. Warm, balanced, or up front? And low, medium, and high intensity? Once you select your vibe you play the part and the plugin takes some time to analyze the sonic content and decide what to do. This, thankfully, takes less than a minute. Which, to be fair, would add up if you’re doing this on every track on a giant mix, but it’s really not longer than loading up a comparable plugin chain and getting some quick tones. The results, though, are worth it. I can’t say every permutation of the plugin sounds great, though in my playing around I’ve found that eventually there’ll be one that gets me exactly almost maybe 80-90% of the way to where I need to be, and that’s huge! The results are good enough to just leave as is, and get a pretty solid mix going just with what the plugin does for you (and your own level balance, because their level balancer kind of doesn’t do what I want it to do).
The Neutron metaplugin has several daughter plugins that the mix assistant uses to create its awesome tones. These are: two compressors, one EQ (gimme another EQ, iZotope!), an exciter, a gate, a transient shaper, and whatever “The Sculptor” is. The mix assistant then decides which of these plugins to use, which order to put them in, and what the settings should be, which is a blessing, because there are so many different things you can do I’m still discovering new quirks that can drastically affect the sound and your creative toolbox.
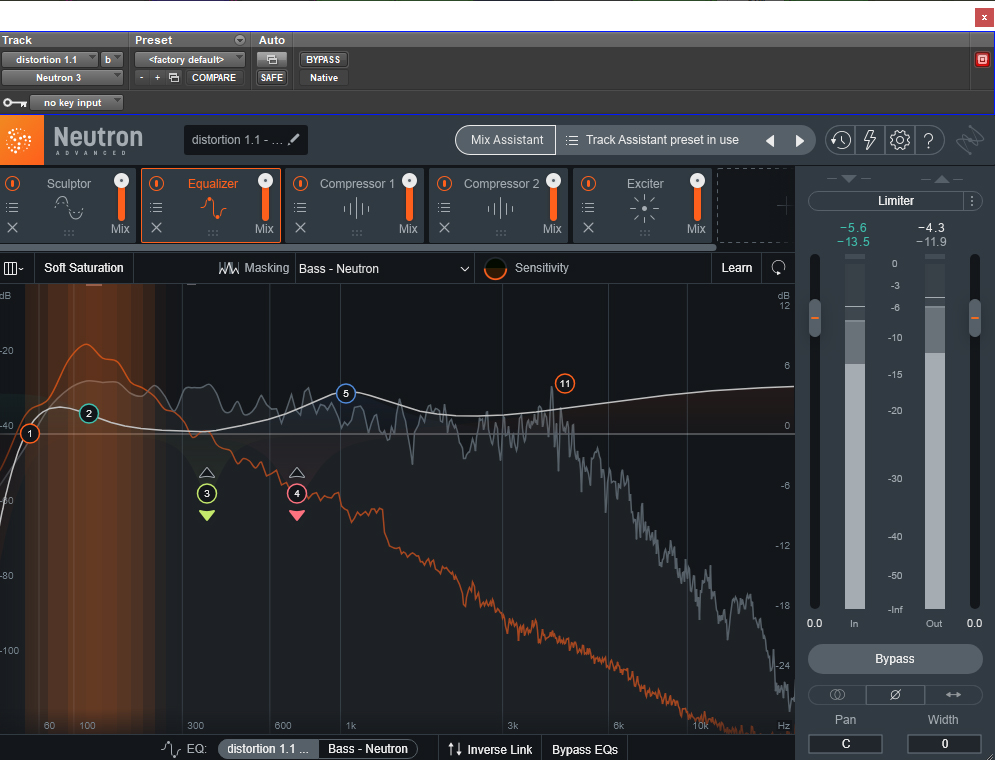
Let’s go over the coolest one first. Every instance of Neutron talks with each other. That’s how they get the (unfortunately not helpful) track balancer to work, but it does so much more, like the extremely helpful masking feature. When it comes to audio, the same frequency showing up in different instruments can cause what is known as masking. The louder source is going to be the one you hear, which affects the sound quality of the quieter source. We can get around this by choosing which frequency content we want each source to have, giving each source its own little range to play in so there’s clarity for everybody. We typically do this using EQ, cutting and boosting the various sources until they play nicely together. But, even with our ears being trained, sometimes it’s hard to find the right frequencies, especially if there’s multiple overlap. iZotope has come up with the perfect solution. Since the plugins talk to each other, when working on a track you can select another track to see an overlay of its frequency content (the orange line). What’s more, you get a nice gradient overlay of the worst masking. Now I know that there’s a lot of low end overlap between the distorted guitar and the bass in the low end, I can see the exact range I need to work on, and can easily make my adjustments until the masking is taken care of. I know you’re supposed to mix with your ears and not your eyes, but this feature speeds up mixing and gives you the ability to overcome instances when your ears fail you. And while we’re on the EQ, all of the 12 bands you can play with have the option of being dynamic. And can be triggered by a sidechain. Meaning I can have the bass trigger the dynamic EQ on that low band on the guitar, cleaning up masking, while allowing the guitar to have that extra heft when the bass isn’t using those frequencies!
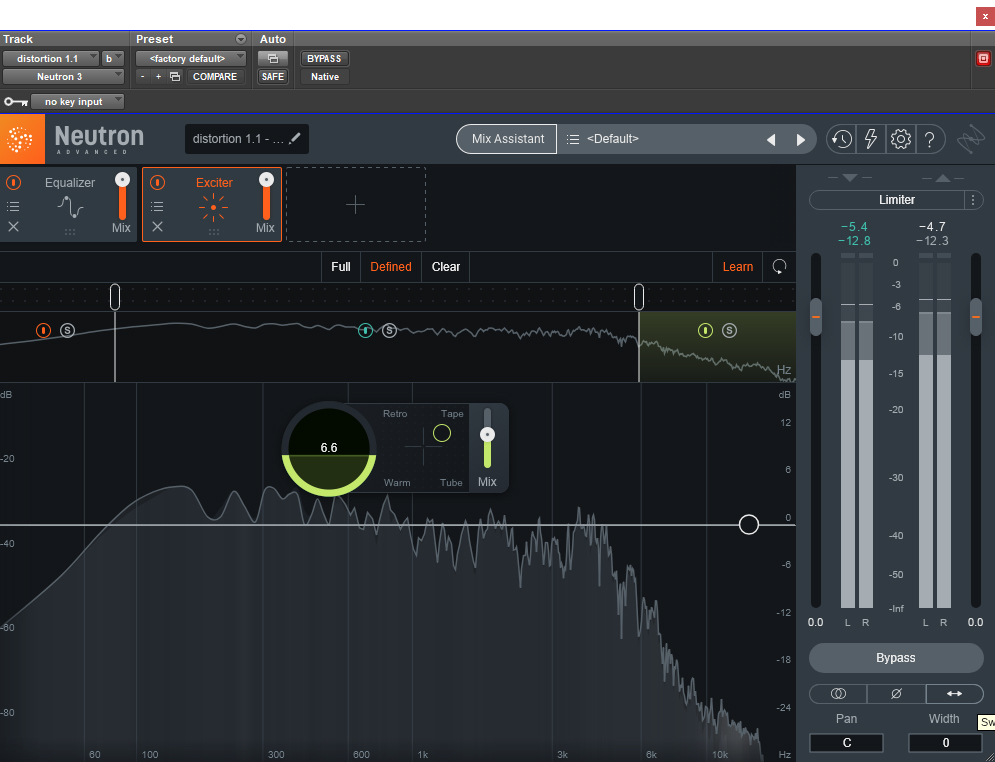
Next up is the exciter. I love this plugin. The controls are super simple. You have an X/Y graph with four different saturation styles at each of the corners: Retro, Tape, Warm, and Tube. All you have to do is drag your little dot around and you get a custom blend of all four, meaning you have near limitless options for your saturation flavor that can be dialed in in a matter of seconds! You have a gain neutral drive settings, which determines the amount of saturation you get, as well as a mix setting, to blend your drive with the dry signal. And three different frequency curves. And the ability to set your own high shelf. And it’s multiband. Three bands, and I’d prefer four, but still. A multiband saturation unit with limitless tonal possibilities? Instead of having to load plugin after plugin to find the right tone, I can get what I want almost instantaneously. If you could buy the exciter on its own, I’d tell you to buy it on its own. Oh, and it comes with Neutron Elements. No multiband, but whatever. This plugin is the best!
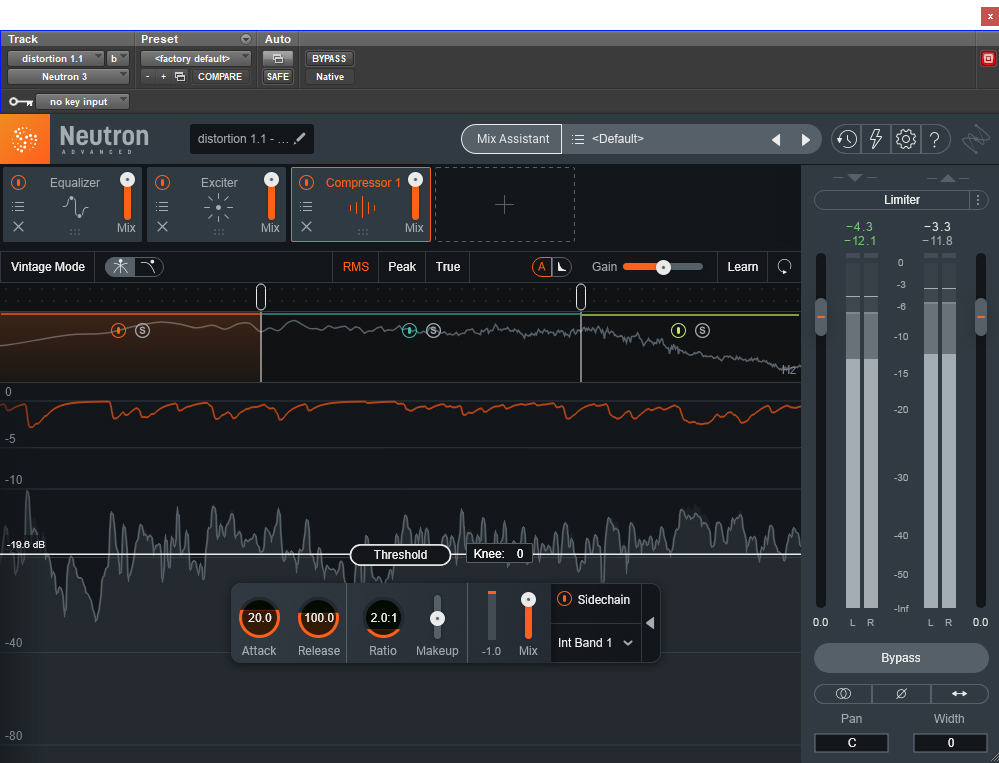
Now for the compressor. A compressor is a compressor, just like an EQ is an EQ. If you want something transparent, which iZotopes plugins tend to be, then what you also want is it to be feature rich. After all, you need an excuse to use this as opposed to your DAW’s stock compressor, and once again, when it comes to the plugins, iZotope gives you something amazing. Your main controls (attack, release, ratio, makeup, mix, and side chain) are all easy to adjust and to see, being right in the middle of your screen. Threshold is set by dragging down a bar, so you have a visible representation of which peaks are gonna be pushed down. Again, ears not eyes, but it’s still useful to have that visual representation. Maybe you just want a little shave off the top. Well, now you can set it quickly without having to listen closely for those minute changes you’re after. You also have a plethora of settings to choose from. Vintage mode, which imparts non-linearities; three different detection modes (RMS, Peak, and True); auto gain makeup and auto release. And, like everything, it’s multiband. Three again, not four or five, so it’s not as versatile as other multiband compressors, but still having one as part of the plugin suite is amazing. Another great, versatile, and most importantly easy plugin to work with. Go iZotope!
Time for the transient shaper. This plugin follows suit in being both easy to use and sounding super good! The main controls are quick to use, you just slide your attack and sustain, as well as three different envelope slopes to choose from. You have three overall algorithms (precise, balanced, loose) to further adjust your envelope settings, and, as always, multiband. The sound of it gets dialed in fast, and it works on literally everything. Using it on drums makes it sound like what I want drums to sound like. Using it on guitars makes it sound like what I want guitars to sound like. I haven’t tried it on vocals, but next to the exciter, this is a go to grab to get things working quickly and amazingly. What else can I say about this one? I love it!
And now we get to the gate. Initially I wasn’t going to talk about the gate. After all, a gate is a gate, and I feel by now I’m being redundant. It’s got the controls you want, easily understandable and adjustable, and of course, multiband. The sidechain capability can be selected for each band, so you can clean up kick and bass low frequency masking without having to cut the entire signal. That’s cool, but does that excite me? Not as much as what the multiband can let you do when you really start digging into it. Gates have been used as quasi transient shapers, with well set hold and release times allowing you to shape the resonance of, say, a kick drum. But you’re still at the mercy of the dynamics of the performance, and it’s easy to miss a hit and then have no note where you should have one. By adding multiband to your gate, you’re able to not only customize the settings of each gate, but also set the open and close values (oh, you get separate open and close settings, instead of a single threshold like most gates). Meaning you can make sure each part of the source is able to poke through and be present. Got too much cymbal bleed in your snare? Gate the top band to only open on the peakiest of the peaks, and slam shut after that crack and sizzle. Got too much resonance in the low end of your kick? Use the gate to sculpt just that region, while preserving the click of the batter. After about a minute of messing around with it, just the multiband function and threshold (I didn’t even touch attack and hold and release) I was able to change the tone and feel of my kick drum much more significantly than any of the other plugins, to the point where it sounded like a completely different drum! I never imagined that a gate could be so powerful, not only in cleaning up a signal, but in shaping its tone and feel. If I actually spent time with it, I’m sure I could get my source so close to where I wanted it to be that I wouldn’t even need the other plugins. Which is insane.

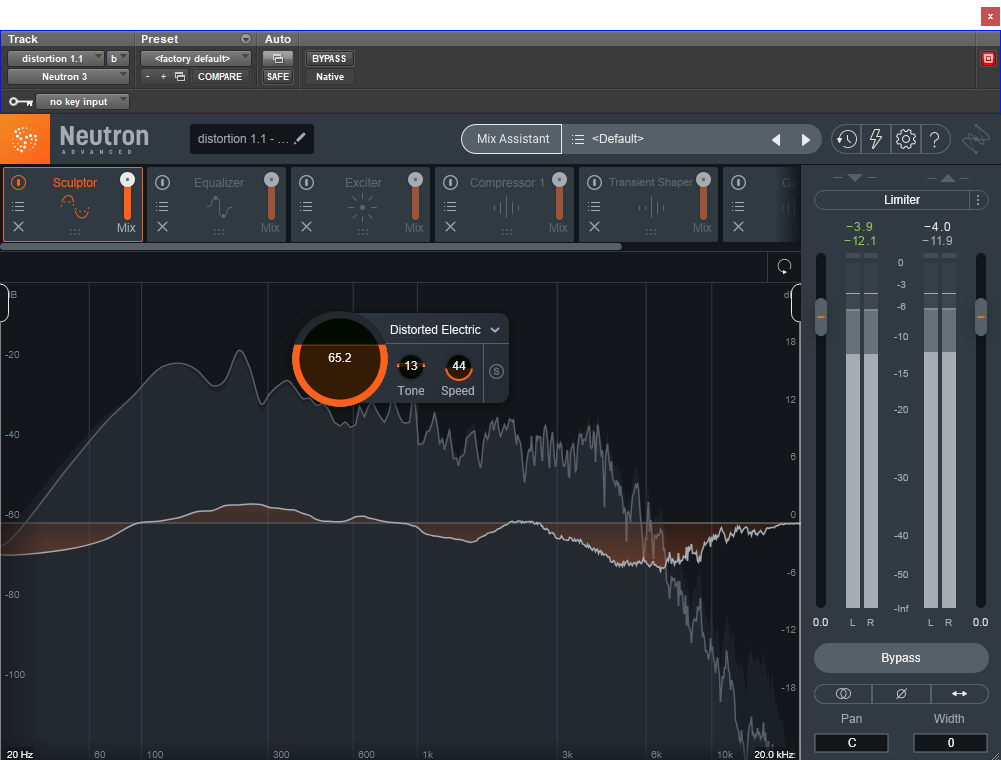
Finally, we move onto what is probably the most unique of the plugins: The Sculptor. When it comes to your mix assistant chains, invariably it’s The Sculptor that gets put first. So what is The Sculptor? It’s an intelligent multiband compressor, but very fine detailed. Like, there are 32 bands. 32 bands!!! That’s an insane amount of compression! Do you get control over the bands? Of course not. That’s too much stuff to adjust, and that goes against Neutron’s ethos: getting things sounding good quickly. The Sculptor operates like your mix assistant. You choose your instrument and it’ll create a custom frequency adjustment curve based on the content of your source, and what the plugin thinks is the ideal balance for your material. You get a few controls, which allow you to quickly and easily adjust what the plugin is doing. You can adjust the amount of sculpting, the overall tonal focus, and the speed of the sculpting, and that’s it. That’s all you need. While it functions as a multiband compressor, it really looks (and sounds) more like a dynamic EQ. Some frequencies get boosted, some get cut, all based on the program material, and the settings you’ve selected. The goal is to shape the sound towards the ideal set by the instrument you’ve selected and it works. Since it invariably goes at the beginning of the signal chain (though you can put it wherever), let’s try getting it to sound good on a distorted guitar without using anything else. After maybe 30 seconds, I’m done. The harshness is cut, the low end is made beefier, it sounds like a fuller and more balanced. I don’t even need everything else in order to get it to sound good! Now I can use the rest of the plugins to make it play well with the other tracks, make sure it’s even enough to be present throughout the mix, and maybe even do some additional adjustments to the tone. This is powerful.
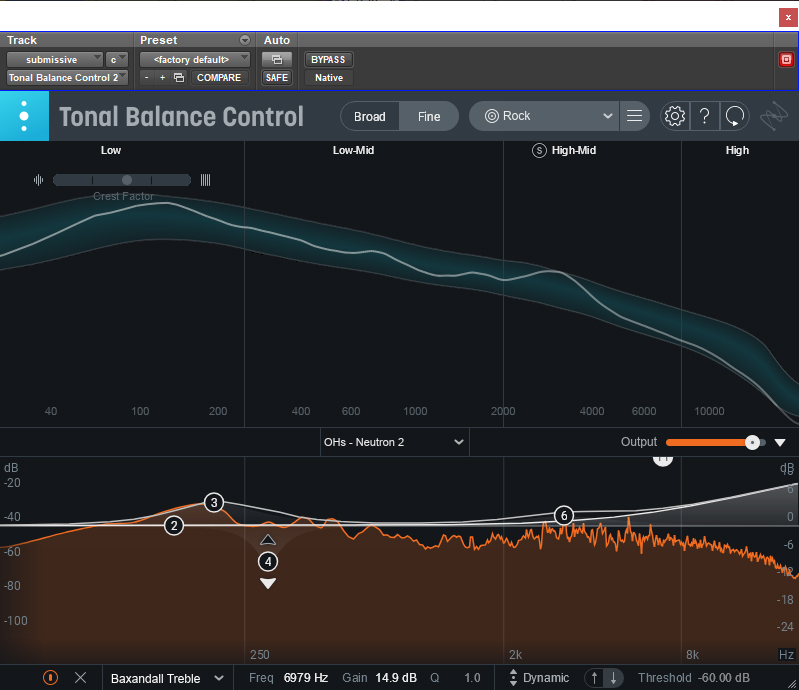
I was in the middle of typing my conclusion and comparing the different versions when I stumbled across yet another feature (there are so many features). Tonal Balance Control is a way to finalize your mix. It gives you an overall breakdown of the frequency level in different bands, and sets targets for your particular genre. You’re then able to select the EQ portion of any track with Neutron on it and adjust it accordingly. Too much low end content? Load up your bass and kick drum tracks and EQ them on the fly, while seeing how it adjusts the overall frequency content of your mix. This will help you make sure that what you send to mastering is balanced and in line with the rest of your genre. You do have to have Neutron on every track, but that’s not the worst thing in the world. Oh, and if you have a specific reference track you want to use, or even a reference album, you can load those up to get their specific frequency curves. Are you kidding me? I no longer have to A/B but rather can focus on the sound of my mix while making sure it stays close to the reference? I can see this as being something particularly useful for mastering, and it does come with Ozone, iZotope’s mastering suite, but it’s still probably going to live on every mix I do from now on. And to think, I almost didn’t even know it existed until I started comparing different versions of the plugin!
There’s just so much, and while I think I’ve covered most of the major features, I know there’s still other stuff, hidden in the options, that will change the operation of the plugin. Minor things, to be sure, but still enough to help you customize everything to suit your needs. Is this a buy? Well, it depends. Elements, definitely. It only comes with a few processes (not the gate or The Sculptor), or a lot of the other features, but it does have mix assistant, and I’ve used it to excellent results. Standard, absolutely. You get access to the majority of the features, including multiband processing (so useful) and the other plugins, including The Sculptor. You also get the visual mixer and level balancer, which I don’t personally like, but maybe you will. After all, they wouldn’t exist if nobody liked them. You don’t get Tonal Balance control, or standalone plugins, though. Are both those features worth an extra $150? You don’t technically need individual plugins, although they are nice. Maybe the meta plugin uses more resources, but unless you’re on something very old your processor should be able to handle it. That leaves us with Tonal Balance Control, and while I haven’t given it enough time to really unleash its power (since I didn’t even realize it existed until five minutes ago), I can say confidently that, if it were its own standalone plugin, then it very likely would be worth the extra $150. It feels like the software revolution that the virtual mixer and track balancer aren’t quite accomplishing yet. It certainly has the potential to be a game changer when it comes to getting a competitive mix, especially for bedroom producers who aren’t working in the top acoustic spaces. And there lies the final problem. Neutron isn’t cheap. Advanced costs $400, and even Elements is $130. This prices out a lot of people just getting in, which is unfortunate. With how intelligent and comprehensive the mix assistant can be, Neutron could be as much a learning tool as it is a mixing tool, helping newer mixers better understand how to get the sounds they’re after while removing the barriers of being new by helping them get competitive mixes. iZotope is offering subscriptions, which is probably the way to go, though if you’re one of those people who likes to own things, this is definitely worth a buy.
As always when it comes with plugins, wait for them to be on sale. In fact, right now you can get an upgrade to Advanced from Elements for only $100, and last December I picked up the entire Elements bundle for $50. You know, less than half of what a single plugin costs. Audio sales are funny like that. If you decide to go for it now, you’ll still save money buying Elements and upgrading to Advanced, so do that. Or wait for a few months until there’s another big sale. Regardless of when you buy, though, you’ll likely find that Neutron becomes a staple of your mix template. I know it is for mine.
If you choose to buy, please use our Sweetwater affiliate links to support the site.
Neutron 3 Elements
Neutron 3 Standard
Neutron 3 Advanced

Lilian Blair is a producer, engineer, and audio educator in the Seattle area. She specializes in studio recording, mixing, and helping artist achieve their musical dreams.